|

TRADUÇÕES:


Obrigada aos nossos
tradutores!
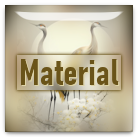
MATERIAL
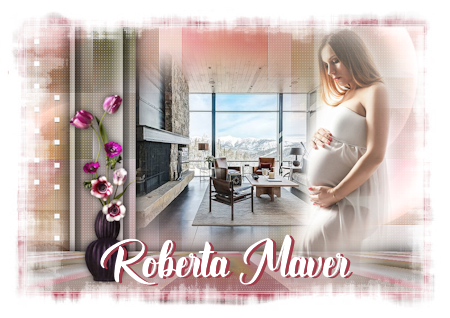
1 Tube principal à sua escolha
2 Misteds Paisagens à sua escolha
1 Tube Decorativo à sua escolha
Deco1_Mãe_RobertaMaver
Deco2_Mãe_RobertaMaver
Titulo_Mãe_RobertaMaver
PLUGINS
Medhi > Sorting Tiles
Carolaine and Sensibility > CS-LDots
Toadies > What are you?
Tramages > Painel Stripes (Importado pelo Unlimited 2)
MuRa's Filter Meister > Perspective Tiling 1.1
TUTORIAL
01 - Abrir o material no PSP, duplique e feche o original.
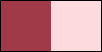
Escolher duas cores para trabalhar.
Foreground - #a03948
Background - #fcdade
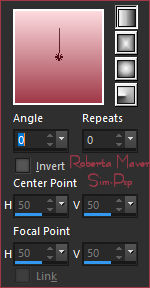
02 - Abra uma imagem transparente de 900 x 600px.
Pintar com o gradiente Linear formado pelas cores escolhidas:
03 - Layers > New Raster Layer.
Selections > Select All.
04 - Edit > Copy no primeiro Misted AR56.
Ou se preferir use um à sua escolha.
Edit > Paste Into Selection.
Selections > Select None.
05 - Effects > Image Effects > Seamless Tiling: Default.
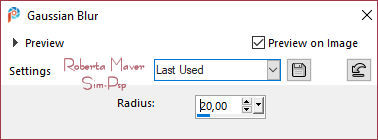
06 - Adjust > Blur > Gaussian Blur:
07- Layers > Merge > Merge Down.
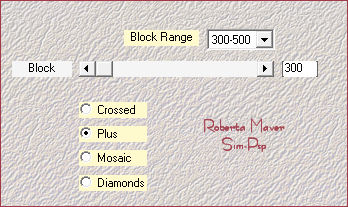
Effects > Plugins > Medhi > Sorting Tiles:
08 - Effects > Edge effects > Enhance.
Layers > Duplicate.
Ative a layer Raster 1
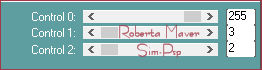
09 - Effects > Plugins > Carolaine and Sensibility > CS-LDots:
Ative a layer
Copy of Raster 1
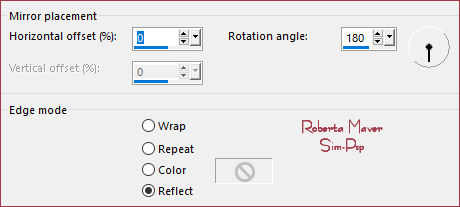
10 - Image > Mirror > Mirror Vertical.
Image > Mirror > Mirror Horizontal.
11 - Effects > Plugins > Toadies > What are you?

Layers > Properties > General > Blend Mode: Hard Light
Ativar a layer Raster 1.
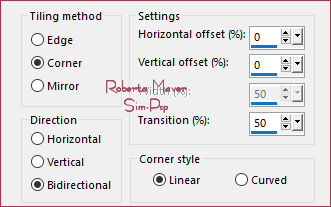
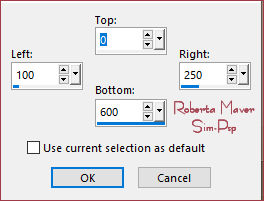
12 - Ferramenta Select tool > Custom Selecton:
13 - Selections > Promote Selection to layer.
Layers > Arrange > Bring to Top.
Selections > Select None.
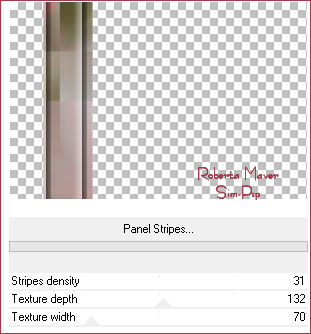
14 - Effects > Plugins > ICNET-Filters -
Filters Unlimited 2 > Tramages > Painel Stripes:
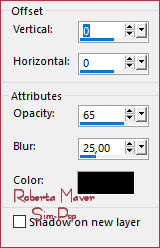
15 - Effects > 3D Effects > Drop Shadow: 0, 0, 65, 25, Color:
#000000
Edit > Repeat Drop Shadow.
16 - Edit > Copy no Deco1_Mãe_RobertaMaver.
Edit > Paste as New Layer.
Layers > Properties > General > Blend Mode: (Luminance L) - Opacity:
100%
Layers > Arrange > Move Down.
17 - Edit > Copy no segundo Misted SvB
interieur 75.
Ou se preferir use um à sua escolha.
Edit > Paste as New Layer.
Ativar a layer Raster 1.
18 - Layers > Duplicate.
Layers > Arrange > Bring to Top.
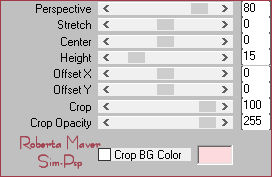
Effects > Plugins > MuRa's Filter Meister > Perspective
Tiling 1.1:
19 - Effects > Reflection Effects > Rotating Mirror:
20 - Effects > 3D Effects > Drop Shadow: 0, 0, 100, 50, Color:
#000000
21 - Edit > Copy no Tube Principal.
Edit > Paste a New Layer.
Image > Resize se necessário, no tube do material o Resize
foi de 80%.
Posicionar à sua direita.
Effects > 3D Effects > Drop Shadow à sua escolha
22 - Image > Add Borders > Symmetric:
1px color: Background #fcdade
3px color: Foreground #a03948
1px color: Background #fcdade
Edit > Copy.
23 - Image > Add Borders > Symmetric:15px
- Color: Foreground #a03948
Selections > Select All.
Image > Add Borders > Symmetric: 40px com qualquer
cor.
Selections > Invert.
Edit > Paste Into Selection.
Adjust > Blur > Gaussian Blur: 20.
24 - Effects > Plugins Carolaine and
Sensibility > CS-LDots:
Selections > Invert.
Effects > 3D Effects > Drop Shadow: 0, 0, 100, 40,
Color: #000000
Selections > Select None.
25 - Edit > Copy no Tube decorativo.
Edit > Paste as New Layer.
Image > Resize se necessáriono, tube do material o Resize
foi de 65%.
Posicionar à esquerda.
Effects > 3D Effects > Drop Shadow à sua escolha
26 - Edit > Copy no titulo_Mãe.
Edit > Paste as New Layer.
Posicionar à sua escolha.
Effects > 3D Effects > Drop Shadow: 1, 3, 100, 00, Color:
Foreground#a03948
ou outra configuração à sua escolha.
27- Edit > Copy no Deco2_Mãe_RobertaMaver.
Edit > Paste as New Layer.
Com a ferramenta Pick Tool, posicionar: Position X:
76 - Position Y: 88
28 - Image > Add Borders > Symmetric: 1px color: Foreground #a03948
29 - Se você desejar, redimensione seu trabalho.
Aplicar sua marca d'água ou assinatura.
File > Export > JPEG Optimizer.


Créditos
Formatação e Tutorial by Roberta
Maver
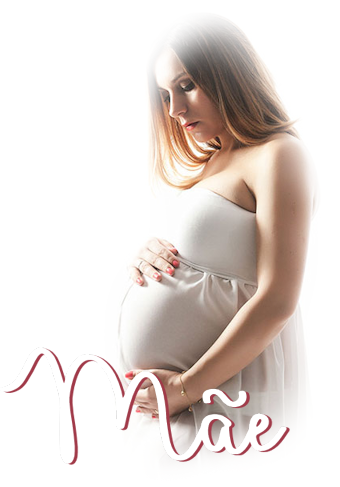
Tube Principal: Tubed by
Lady Valella
Misted Paisagem 1: by Ana
Ridzi
Misted Paisagem 2: by
Syl
Tube decorativo: Tubed by Pqna&Alice
Créditos Versão:
Tube Principal: Tubed by Pqna&Alice
Misted Paisagem: by Animabelle
Tube Decorativo: Tubed by
Lisa T
26/04/2022
Sinta-se à vontade para enviar suas versões.
Terei todo o prazer em publicá-las em nosso site.


|
Tutorial criado por
Roberta Maver em Abril/2022,
para
SIM-PSP.
Não poderá ser copiado, retirado de seu lugar, traduzido
ou utilizado em listas de aprendizados ou grupos sem o
consentimento prévio da autora. |
|