|
Tutorial By
LeniDiniz
English Translation by SIM-PSP moderation
Original Tutorial
MATERIAL
1 main tube of your choice
1 decorative tube of your choice
decor_natal-1_leni
decor_natal-2_leni
alphachannel_anonovo22
Mask LeniDinizMask_LDM074
tituloanonovo22_leni
PLUGINS
Dsb Flux
Mehdi
Carolaine and Sensibility
Graphics Plus
COLORS
Foreground: #073eac
Background: #c2e7f6

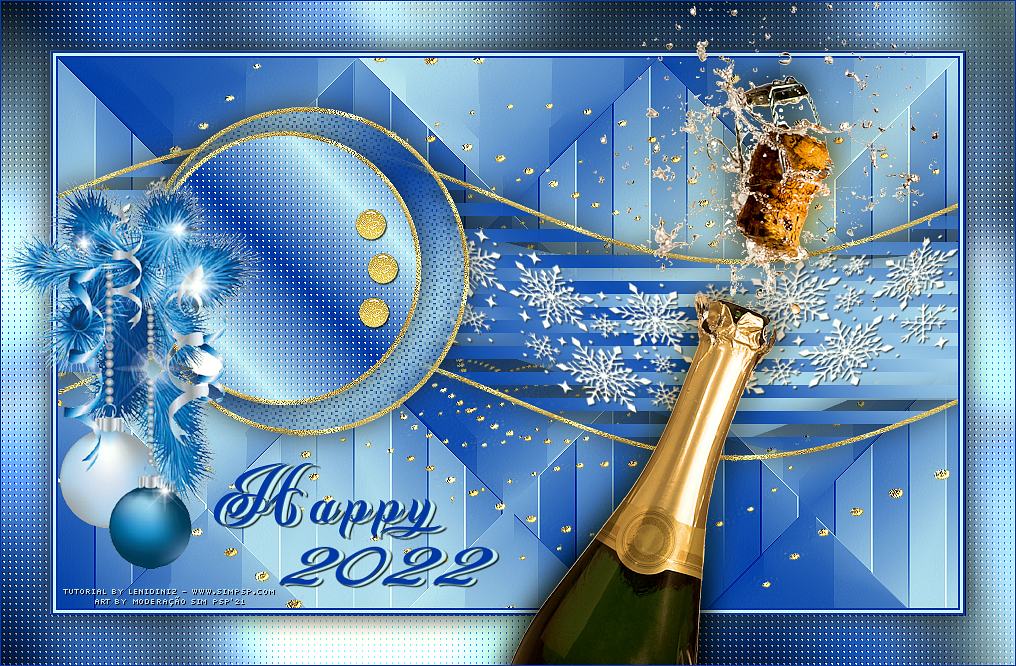
TUTORIAL
01-
Open the material on the psp, copy and close the original.
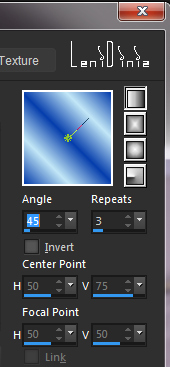
Create a Linear gradient with the chosen colors:
02- Activate the alphachannel_anonovo22.
Paint with Linear Gradient.
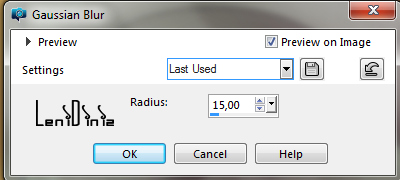
Adjust > Blur > Gaussian Blur: 15
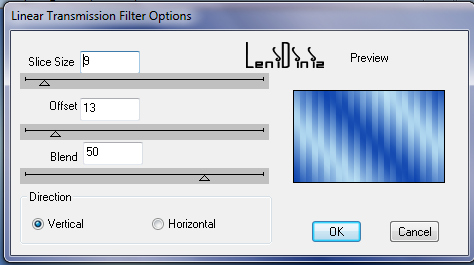
03- Effects > Plugins > Dsb Flux > Linear Transmission:
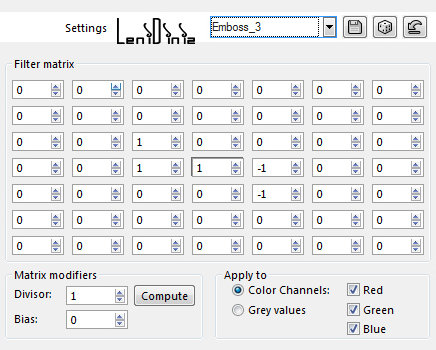
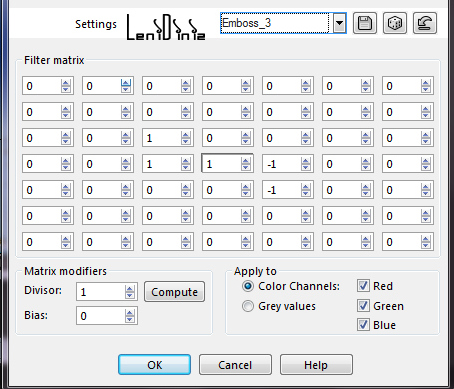
04- Effects > User Defined Filter > emboss 3:
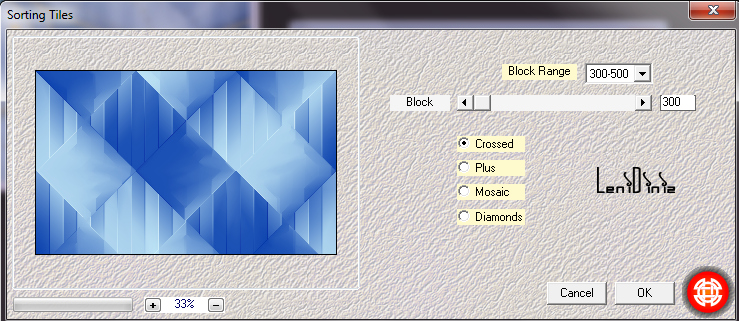
05- Effects > Plugins > Mehdi > Sorting Tiles:
06- Adjust > Sharpness > Sharpen.
Layers > New Raster Layer.
Configure the Foreground
with the pattern 20_pattern: Angle: 0 - Scale: 100.
Paint this layer with 20_pattern.
07-
Layers > New Mask Layer > From image: LeniDinizMask_LDM074
Layers > Merge > Merge Group.
Layers > Duplicate.
Layers > Merge > Merge Down.
Effects > User Defined Filter > emboss 3
08- Layers > New Raster Layer.
Selections > Load/Save Selections > Load Selection from Alpha
Channel: anonovo21_leni
Paint this selection with the Linear gradient:
09- Adjust > Blur > Gaussian Blur: 15
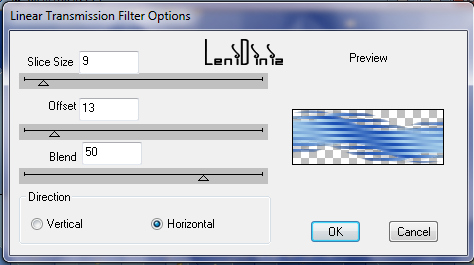
10- Effects > Plugin > Dsb Flux > Linear Transmission:
11- Selections > Modify > Select Selection Borders:
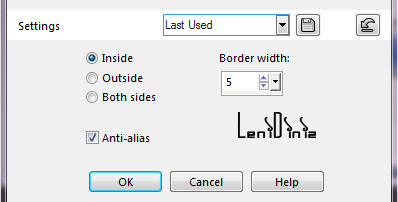
Paint the selection with pattern 20_pattern.
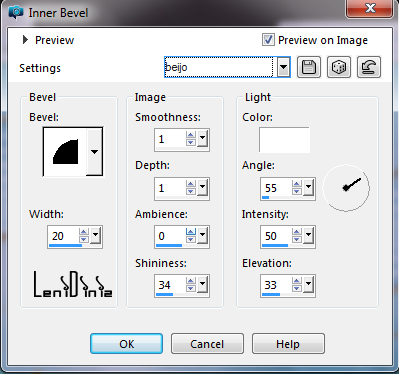
12- Effects > 3D Effects > Inner Bevel:
13-
Selections > Select None.
With the Pick Tool: Scale tool, pull the sides until the left and
right edges are hidden:
14- Effects > 3D Effects > Drop Shadow: 0, 0, 80, 40.
Color: #000000
15- Edit > Copy in decor_leni_anonovo_1.
Effects > 3D Effects > Drop Shadow: 1,1, 90,1. Color: #000000
16- With the Pick Tool Tool, position: Position: X 0 Position: Y 90
17- Layers > New raster Layer.
Selections > Load/Save Selections > Load Selection from Alpha
Channel: anonovo21_leni_2
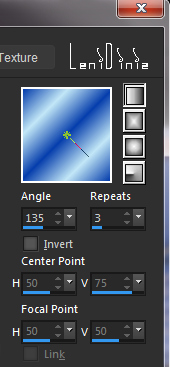
Paint this selection with the Linear gradient: Angle: 135 - Repeats: 3
18- Adjust > Blur > Gaussian Blur: 15
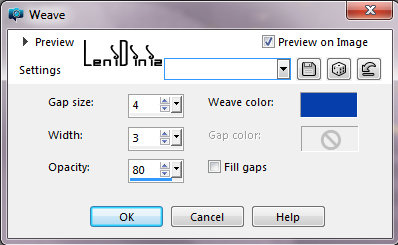
19- Effects > Texture Effects > Weave:
Weave color: Foreground
color
20- Adjust > Sharpness > Sharpen.
Selections > Modify > Select Selection Borders:
Paint the selection with
pattern 20_pattern.
21- Effects > 3D Effects > Inner Bevel:
22-
Selections > Select None.
Effects > 3D Effects > Drop Shadow: 0, 0, 80, 40. Color: #000000
23- Layers > New raster Layer.
Load/Save Selections > Load Selection from Alpha Channel: anonovo21_leni_3
Paint this selection with the Linear gradient: Angle: 45 - Repeats: 3
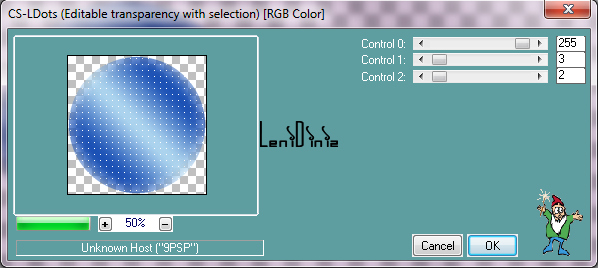
24- Effects > Plugins > Carolaine and Sensibility > CS-LDots:
25- Effects > User Defined Filter: emboss 3
26- Selections > Modify > Select Selection Borders:
Paint the selection with
pattern 20_pattern.
27- Effects > 3D Effects > Inner Bevel:
28- Selections > Select None.
Effects > 3D Effects > Drop Shadow: 0, 0, 80, 40. Color: #000000
29- Edit > Copy
in decor decor_leni_anonovo_2
With the Pick Tool Tool, position: Position X: 295 Position Y: 151
30- Edit > Copy Special > Copy Merged.
31- Image > Add Borders:
2 px > simmetric > color: foreground
3 px > symmetric > color: background
2 px > symmetric > color: foreground
32- Selections > Select All.
33- Image > Add Border >
50 px symmetric > any color.
Selections > Invert.
Edit > Paste into Selection
34- Adjust > Blur > Gaussian Blur: 15
35- Effects > Plugins > Carolaine and Sensibility > CS-LDots:
36- Effects > User Defined Filter > emboss 3
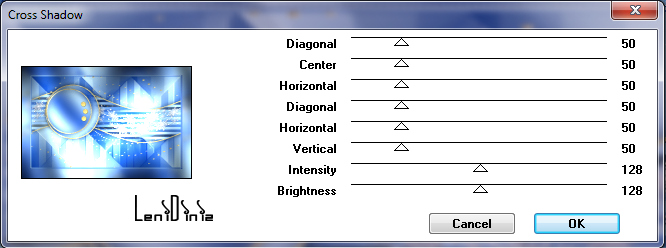
37- Effects > Plugins > Graphics Plus > Cross Shadow:
38- Selections > Invert.
Effects > 3D Effects > Drop Shadow: 0 > 0 > 100 > 40.
Color: #000000
Selections > Select None.
39- Edit > Copy no tube principal.
Edit > Paste as New Layer.
Image > Resize: if necessary.
Adjust > Sharpness > Sharpen
Position to the right.
Effects > 3D Effects > Drop Shadow:
your choice.
40- Edit > Copy no Callitubes-50natal.
Image > Resize 65%, Resize all layers unchecked.
With the Pick Tool Tool,
position: Position X: 0 Position Y: 174
Adjust > Sharpness > Sharpen.
Or decorate as you like with another tube.
41- Edit > Copy no título_leni_happy2022.
Edit > Paste as New Layer.
Position of your choice.
Effects > 3D Effects > Drop Shadow:
your choice.
42- Image > Add Borders >
1 px > simmetric > color: foreground
43- Effects > Plugins > AAA Filters > Custom > Landscape: default

44-
Apply your watermark or signature.
File > Export > JPEG Optimizer.
CREDITS:
Tutorial by
LeniDiniz
English Translation by
Moderation SIM-PSP
Main Tube: download
here
Decorative tube: Tubed by
Callitubes
Mask: by Leni Diniz
Feel free to send your versions.
I will be happy to publish them on our website.
Tutorial created by Leni Diniz,
in
November/2021 for SIM-PSP. Translated into English in
December/21, by the Moderation of SIM-PSP. It cannot
be copied, removed from its place,
translated or used in learning lists or
groups without the author's prior consent.
|
|