|
TRADUÇÕES:
Obrigada aos nossos tradutores!
MATERIAL
Color 4: #FFFFFF Color 5: #000000
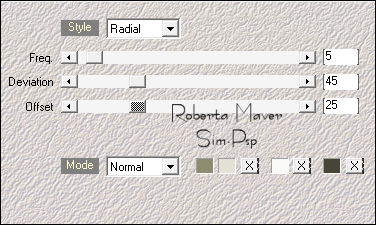
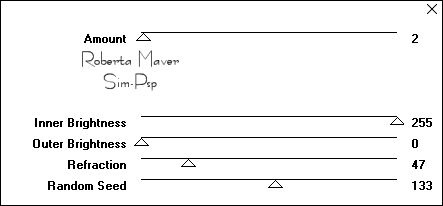
Effects > Plugins > Mehdi > Wavy Lab 1.1. Cores na sequência: 2, 1, 3: Cor 4 escolhe uma mais escura, a minha foi: #464638
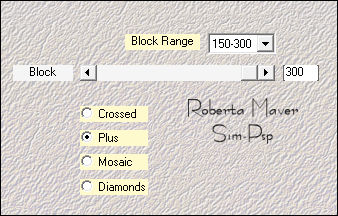
Effects > Plugins > Mehdi > Sorting Tiles:
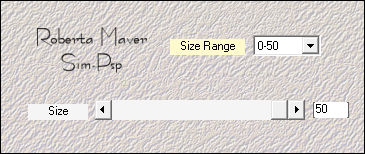
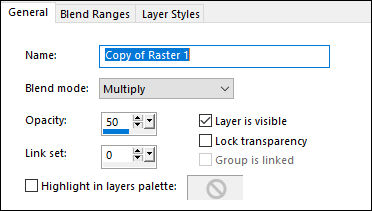
6 - Layers > Duplicate. Image > Mirror > Mirror Horizontal. Layers > Properties > General > Blend Mode: Multiply - Opacity: 50
*Fique à vontade para mudar o Blend mode conforme as cores que está usando.
Layers > Merge > Merge Down.
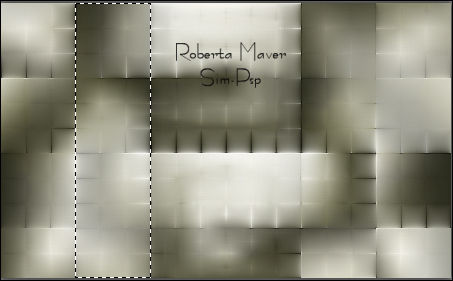
Com a ferramenta Selection Tool: Feather: 0, selecionar como no exemplo:
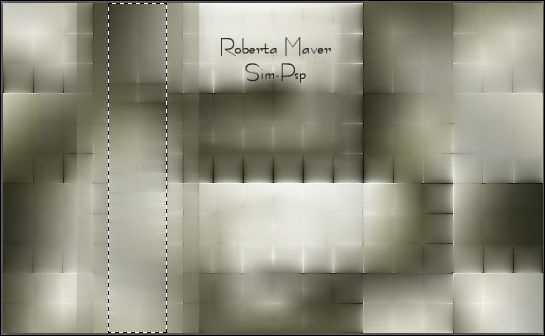
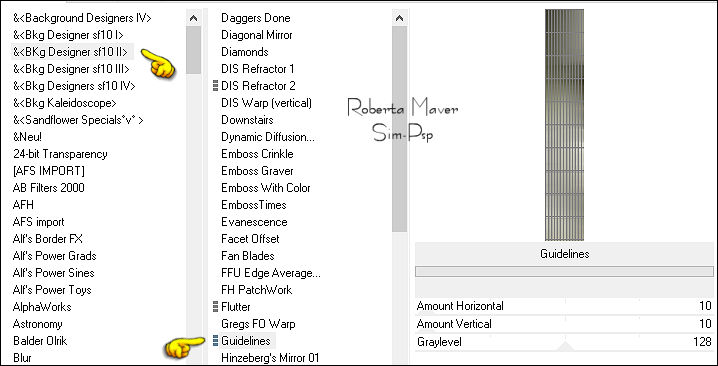
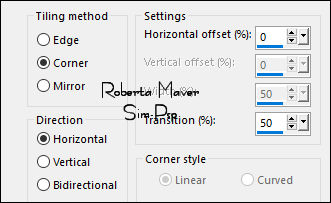
Selections > Promote Selection to Layer. 9 - Effects > Plugins > Filters Unlimited 2.0 > Bkg Designer sf10 II > Guidelines:
10 - Selections > Select None. Effects > 3D Effects > Drop Shadow: 0, 0, 100, 50, Color: #000000 (preto) Ativar a layer Promoted Selection. Effects > 3D Effects > Drop Shadow: 0, 0, 100, 50, Color: #000000 (preto) Ativar Layer do topo Layers > Merge > Merge Down.
Layers > Duplicate. Image > Mirror > Mirror Horizontal. Layers > Merge > Merge Down.
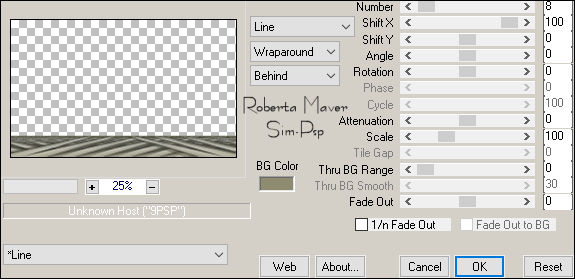
13 -Effects > Plugins > MuRa's Filters Meister > Copies:
Effects > 3D Effects > Drop Shadow: 0, 0, 100, 50, Color: #000000 (preto) Ativar a layer Raster 1
14 - Effects > Plugins > Carolaine & Sensibility > CS-LDots:
15 -
Edit > Copy no Deco1_byRoberta Layers >
Duplicate.
16 - Layers > New Raster Layer. Ativar a ferramenta Selection Tool: Retangle > Custon Selection:
Pintar com um gradiente Linear pelas cores escolhidas: Foreground #e3e1d5 - Background #8d8c70
17 -
Edit > Copy no Misted Paisagem.
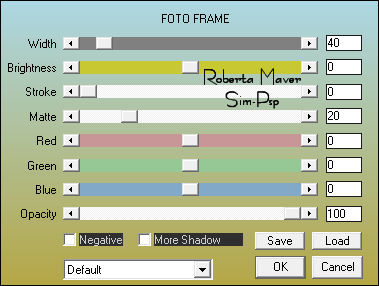
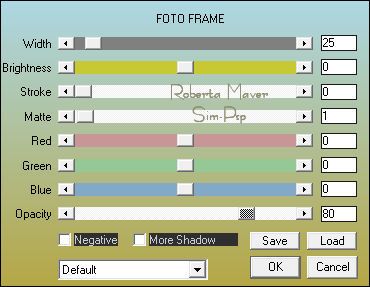
18 - Effects > Plugins > AAA Frames > Foto Frame
Selections > Modify > Contract: 40 Selections > Promote Selection to Layer. Selections > Select None Ativar a Layer Raster 3 (Efeito Foto Frame)
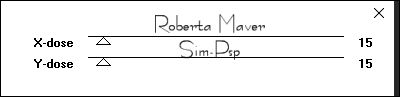
19 - Effects > Plugins > VM Natural > Acid Rain:
Ativar a layer Promoted Selection 1
20 - Layers > Merge > Merge Down. Effects > Image Effects > Seamless Tiling:
Layers >
Duplicate. Layers > Merge > Merge Down. Effects > 3D Effects > Drop Shadow: 0, 0, 100, 50, Color: #000000 (preto)
21 - Edit > Copy no Deco2_byRoberta. 22 - Image > Add Borders > Symmetric:
1 px - Color: #000000 (preto) Selections > Select All.
Pintar com um gradiente Linear pelas cores escolhidas: Foreground: #e3e1d5 - Background: #8d8c70
24 - Effects > Plugins > VM Natural > Acid Rain:
Selections > invert. Selections > Select None
Layers > Properties > General > Blend Mode: Luminance (L)
27
- Edit > Copy no Tube Principal. Adjust > Sharpness > Sharpen. Posicionar à direita.
Effects > 3D Effects > Drop Shadow: à sua escolha.
Adjust > Sharpness > Sharpen.
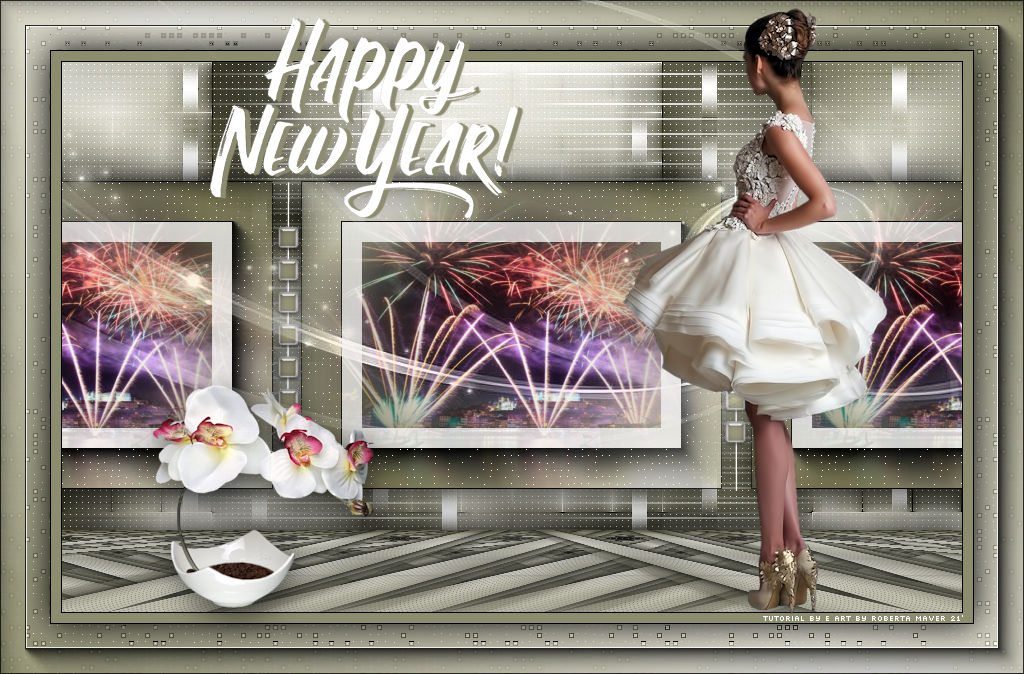
29 - Edit > Copy no Titulo_HappyNew_byRoberta. Effects > 3D Effects > Drop Shadow: 1 / 5 / 100 / 1, Color: #8d8c70 (Background)
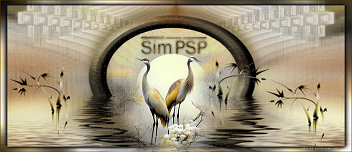
Tube: Paisagem_RobertaMaver
Sinta-se à vontade para enviar suas versões. Terei todo o prazer em publicá-las em nosso site.
|