|
Tutorial By
LeniDiniz
MATERIAL 1 tube of Christmas tree or another one of your choice 1 tube Christmas decoration. Mask 1250182067_nikita_masque Mask NarahsMasks_1508 Decor_natal21_leni Título_natal21_leni  PLUGINS Mehdi Mura's Meister AAA Frame. Colors 1
Colors 2
Extra Colos: #ffffff (White)
TUTORIAL 01- Open the material on the psp, copy and close the original. 02- Open a 900x550px transparent image. Effects > Plugins > Mehdi > Lab1.1: In the color sequence of palette 1
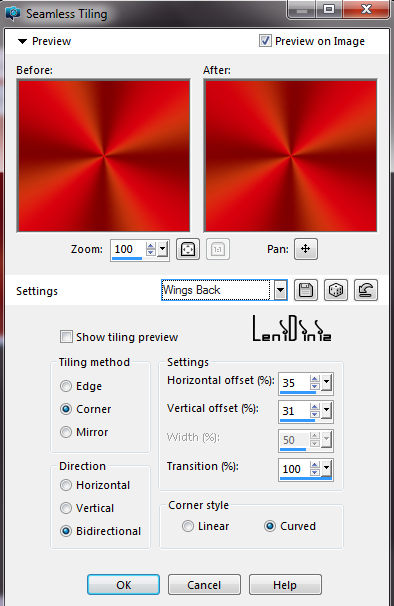
03- Effects > Image Effects > Seamless Tiling: Wings Back
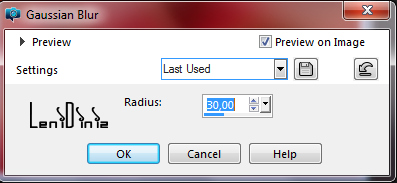
04- Adjust > Blur > Gaussian Blur: 30
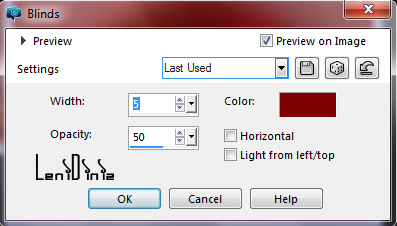
05- Effects > Texture Effects > Blinds: Color: #800000
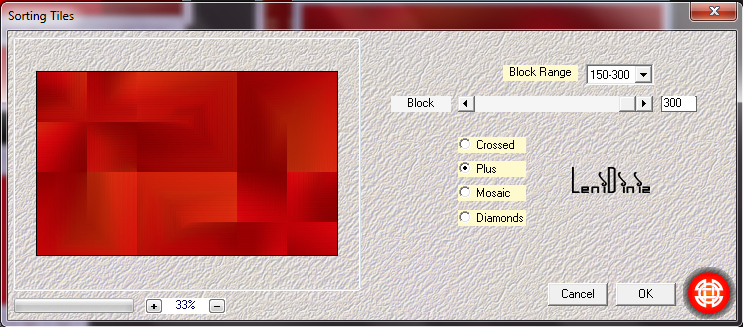
06- Effects > Plugins > Mehdi > Sorting Tiles:
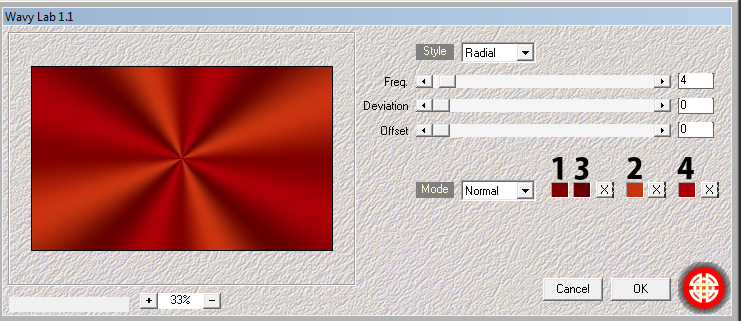
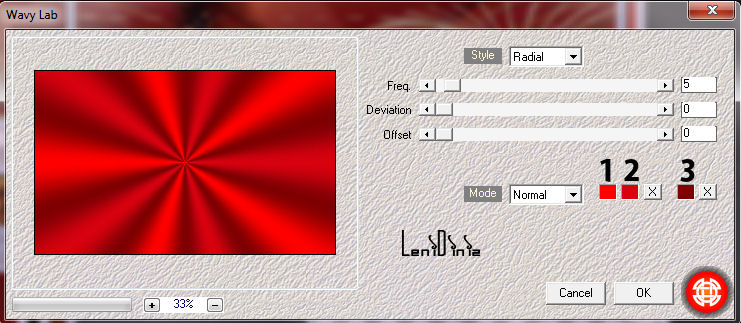
07- Effects > Edge effects > Enhance. Layers > New Raster Layer Effects > Plugins > Mehdi > Wavy Lab: In the color sequence of palette 2
08- Effects > Image Effects > Seamless Tiling: Wings Back
Adjust > Blur > Gaussian Blur: 30
09- Effects > Texture Effects > Blinds: Color: #800000
10- Effects > Plugins > Mehdi > Sorting Tiles:
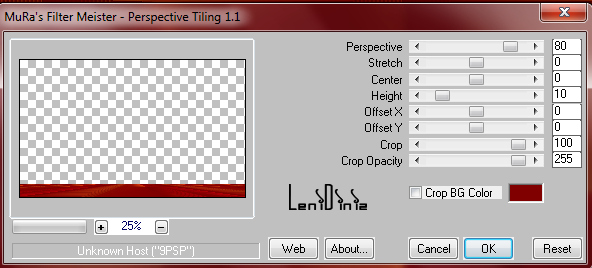
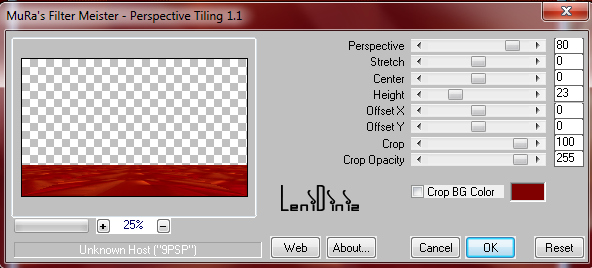
11- Effects > Edge effects > Enhance. Layers > Duplicate. Effects > Plugins > Mura's Meister > Perspectiva Tiling:
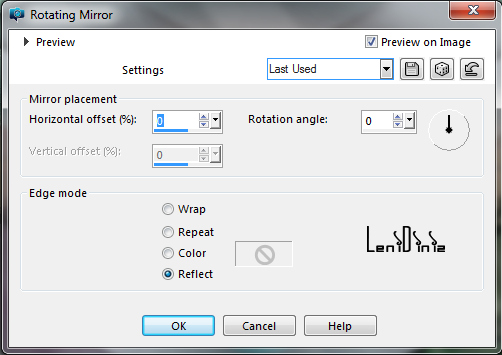
12- Effects > Reflection Effects > Rotating Mirror: Default
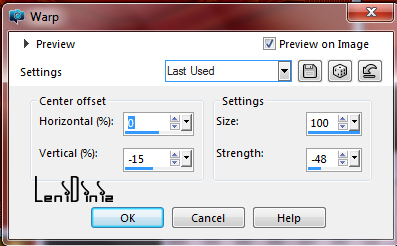
13- Image > Mirror > Mirror Vertical. Effects > Distortion Effects > Warp:
14- Effects > 3D Effects > Drop Shadow: 0 > 0 > 100 > 40, Color: #000000 15- Activate the layer Raster 2. Effects > Mura's Meister > Perspectiva Tiling: Height 23
16- Effects > Reflection Effects > Rotating Mirror: Default
17- Effects > 3D Effects > Drop Shadow: 0 > 0 > 100 > 40, Color: #000000 Activate the layer Copy of Raster 2. 18- Configure the Foreground with Pattern 20_pattern:
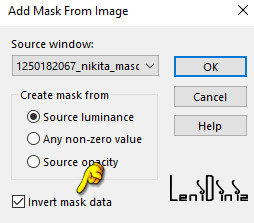
Layers > New Raster Layer. Paint this layer with the Pattern. Layers > New Mask Layer > From image > 1250182067_nikita_masque:
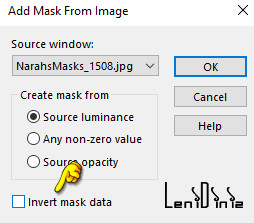
Layers > Merge > Merge Group. 19- Layers > New Raster Layer, Paint with the color #ffffff (white) Layers > New Mask Layer > From image: NarahsMasks_1508
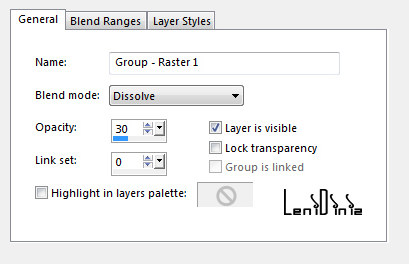
Layers > Merge > Merge Group. 20- Layers > Properties > General > Blend Mode: Dissolve - Opacity: 30
21- Edit > Copy in the tube of the Christmas tree. Edit > Paste as New Layer. Image > Resize: if necessary. Position to the left. Adjust > Sharpness > Sharpen. Effects > 3D Effects > Drop Shadow: your choice. 22- Edit > Copy in decor_natal21_leni Edit > Paste as New Layer. With the Pick Tool Tool, position: Position X: 455 Position Y: -10 Adjust > Sharpness > Sharpen. 24- Activate the layer Raster 1. Edit > Copy. 25- Selections > Select All. Image > Add Border > Symmetric: 3 px any color. Selections > Invert. Paint the selection with the gold pattern. Selections > Select None. 26- Image > Add Borders > Symmetric: 2 px - Color: #d7010f 27- Selections > Select All. Image > Add Borders > Symmetric: 3 px any color. Selections > Invert. Paint the selection with the gold pattern. Selections > Select None. 28- Selections > Select All. Image > Add Borders > Symmetric: 50 px any color. Selections > Invert.
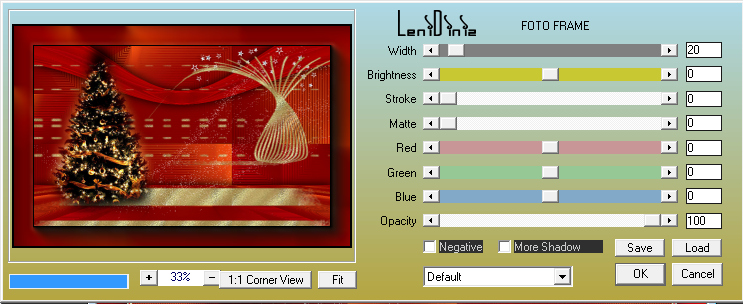
Selections > Invert. Effects > 3D Effects > Drop Shadow: 0 > 0 > 100 > 40, Color: #000000 Selections > Invert. 30- Effects > Plugin > AAA Frame > Foto Frame:
Selections > Select None. 31- Edit > Copy on the decorative Christmas tube.
Edit > Paste as New Layer. Position to the right. Adjust > Sharpness > Sharpen. Effects > 3D Effects > Drop Shadow: your choice. 32- Edit > Copy in titulo_natal21_leni. Edit > Paste as New Layer. Position of your choice.
Effects > 3D Effects > Drop Shadow:
your choice. 33- Apply your watermark or signature. Layers > Merge > Merge All. File > Export > JPG Optimizer.
CREDITS: Main Tube: Tubed by Nikita Tube decoração: Tubed by Isa Masks: Nikita e Narah Mask
Feel free to send your versions.
|