|
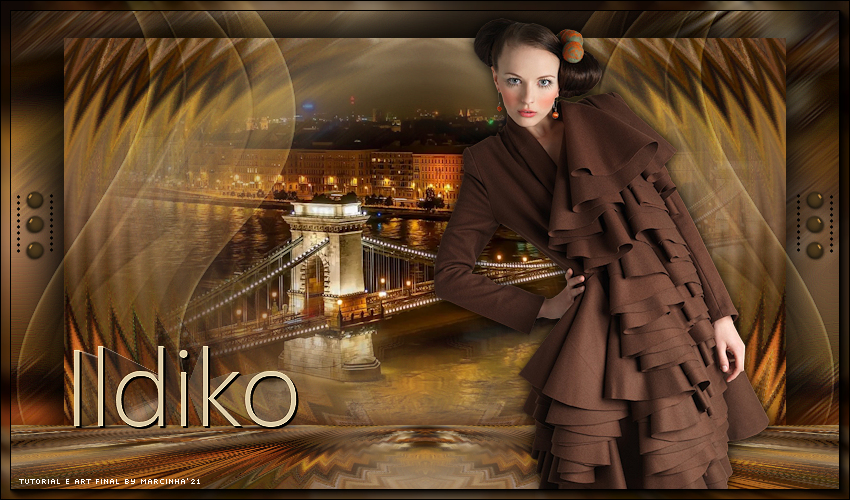
Tutorial dedicado a Ildiko O ano de 2020 foi atípico, muitos preferem esquecer este ano que se findou. Porem o SimPsp precisa agradecer a todos que acompanharam o grupo postando seus trabalhos, clicando em curtir ou deixando uma mensagem. E a nossa querida Ildiko ficou em segundo lugar na soma geral de postagem, curtidas e mensagens. Muito obrigada Ildiko por se juntar a nossa família e fazer o nosso ano um pouco mais feliz.
TRADUÇÕES:
Obrigada aos nossos tradutores!
MATERIAL 1 Tube Principal à sua escolha 1 Misted Paisagem à sua escolha Mask smArt_maszk_47 Titulo_Ildiko decor_Ildiko
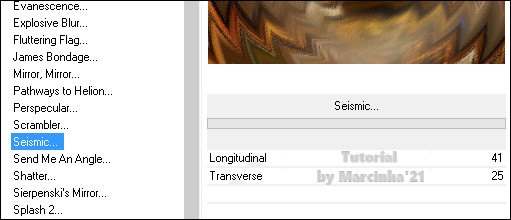
PLUGINS Déformation: Seismic > importe pelo Unlimited 2.0 MuRa's Filters Meister > Perspective Tilling Graphics Plus > Cross Shadow AAA Frames > Foto Frame
ROTEIRO
01- Abrir o material no PSP, duplique e feche o original. Escolher duas cores para trabalhar. #451600 > Foreground #dbcaa6 > Background
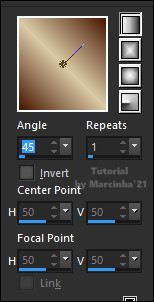
02- Abra uma imagem transparente de 850x500px. Pintar com um gradiente formado pelas cores escolhidas: Linear - Angle:45 - Repeats: 1
03- Adjust > Blur > Gaussian Blur: 30 Layers > New Raster Layer. Selections > Select All.
04- Edit > Copy no tube misted paisagem. Selections > Select None. Effects > Image Effects > Seamless Tiling: Default.
05- Adjust > Blur > Motion Blur: Angle 50, Strength 50. Edit > Repeat > Montion Blur. Effects > Edge Effects > Enhance More. Layers > Merge > Merge Down.
06- Layers > Duplicate. Effects > Plugins > Unlimited 2.0 > Déformation > Seismic
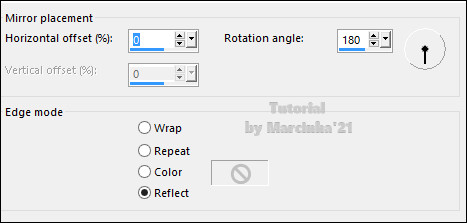
07- Effects > Reflection Effects > Rotating Mirror
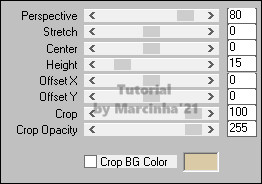
08- Image > Resize: 85% - all layers desmarcado. Layers > Duplicate. Effects > Plugins > MuRa's Filters Meister > Perspective Tilling:
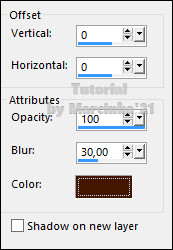
09- Effects > 3D Effects > Drop Shadow: 0, 0, 100, 30. Color do foreground
10- Ativar a layer Copy of Raster 1
Selections > Select All. Selections > Invert. Layers > Merge > Merge Down.
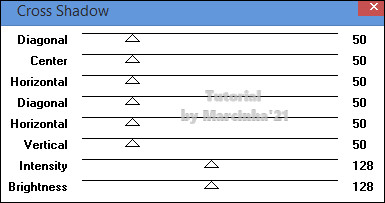
11- Effects > Plugins > Graphics Plus > Cross Shadow
Selections > Invert. Effects > 3D Effects > Drop Shadow: 0, 0, 100, 80, color: #000000 Edit > Repeat > Drop Shadow Selections > Select None.
12- Layer Raster 1 ativada:
Edit > Copy no tube misted paisagem Posicione ao centro.
13- Layers > New Raster Layer. Pintar com a cor clara do background Layers > New Mask Layer > From image: smArt_maszk_47 Layers > Merge > Merge Group. Layers > Properties > General > Blend Mode: Soft Light Effects > Edge effects > Enhance.
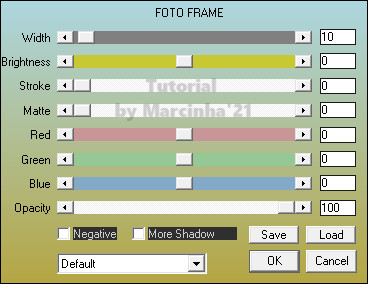
14- Layers > Merge > Merge Visibile. Effects > Plugins > AAA Frames > Foto Frame:
15- Edit > Copy no tube principal Posicionar. Effects > 3D Effects > Drop Shadow à sua escolha.
16- Edit > Copy no Titulo_Ildiko. Posicionar à sua escolha.
17- Edit > Copy no decor_Ildiko.
18 - Se você desejar, redimensione seu trabalho. Aplicar sua marca d'água ou assinatura. File > Export > JPEG Optimizer.
CREDITOS Tutorial, Formatação e Art Final by Márcinha' 21Vers1 > Tube by Le Monde de Bambou - Misted Paisagem by me - Mask by smArt Vers2 > Tube by Nikita - Misted Paisagem by me - Mask by smArt
Sinta-se à vontade para enviar suas versões. Terei todo o prazer em publicá-las em nosso site.
|