|
Material 1 christmas image in jpg 1 Main tube of your choice 1 Tube of Christmas decoration Mask: Astrid masker 62a Title WordArt_Leni Golden Pattern
Colors: Foreground #95332a Background #ffffff
Plugins: VanDerLee > Snowflakes. AAA Frame. Mehdi
TUTORIAL:
1- Open the duplicate material and
close the original.
2- Selections > Select All. Edit > Paste Into Selection. Selections > None.
3- Effects > Image Effects > Seamless Tiling > Default.
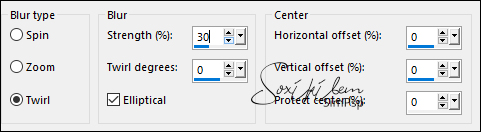
4- Adjust > Blur > Radial Blur:
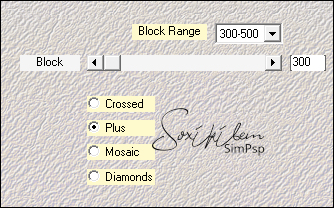
5- Effects > Plugins > Mehdi > Sorting Tilling:
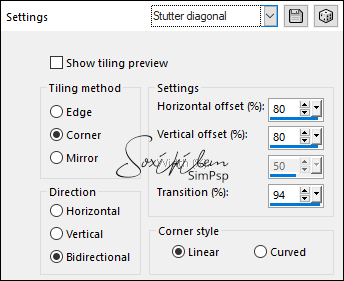
6- Effects > Image Effects > Seamless Tiling > Stutter Diagonal:
Effects > Edge Effects > Enhance More.
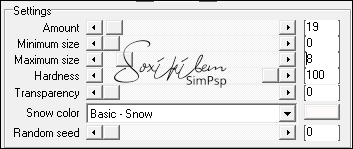
7- Effects > Plugin > VanDerLee > Snowflakes:
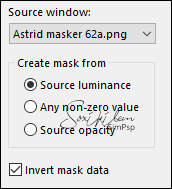
8- Layers > New Raster Layer Color with the foreground color. Layers > New Mask Layer > From image: Astrid masker 62a:
Layers > Merge > Merge Group.
9- Image > Mirror Horizontal Layers > Duplicate. Image > Mirror Vertical Layers > Merge > Merge Down. Effects > Edge Effects > Enhance More.
10- Edit > Copy no tube christmas decoration Image > resize if necessary. Paste As New Layer, position. Adjust > Sharpness > Sharpen Position to the right centering on the mask effect.
11- Edit > Copy on the main tube. Edit > Paste As New Layer, posicione à direita. Adjust > Sharpness > Sharpen Effects > 3D Effects > Drop Shadow to your liking. 12- Activate Raster1. Edit > Copy Edt > Paste As New Image, reserve.
13- Image > Add Bords: 1 px background color 1px foreground color 1 px background color 14- Selections > Select All Image > Add Bord > 2 px with any color. Selections > Invert. Paint this selection with the golden pattern. Selections > None. 15- Image > Add Bords: 1 px backgrund color 1px foreground color 1 px background color
16- Selections > Select All Image > Add Bords > 40 pixes with any color. Selections > Invert. Edit > Copy on the image that is reserved. Edit > Paste Into Selection. Adjust > Blur > Gaussian Blur:10 Selections > Invert Effects > 3D Effects > Drop Shadow: 0, 0, 100, 50 black color Selection > Invert.
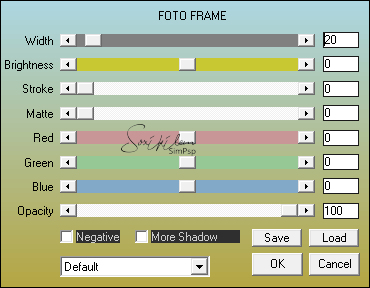
17- Effects > Plugin > AAA Frame > Foto Frame:
Selections > None.
18- Image > Add Bords: 1 px background color 1px foreground color 19- Edit > Copy on the title leni_titulo_natal_II Edit > Paste as new layer. Position. 20- Sign or apply your watermark in a new layer. File > Export > JPG Optimizer  Tutorial by LeniDiniz
Credits: Tutorial by LeniDiniz Tube by Animabelle Decor Tube pngegg(6) wordart by LeniDiniz
Feel free to send your versions.
|