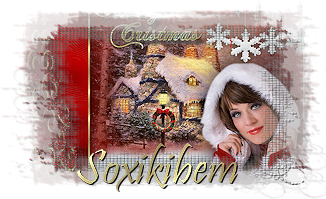
  Tutorial by Leni English Translation by Soxikibem Original Tutorial
Material:
1 main tube
1 misted landscape
Decorative tube
Pattern
Goldfill1
Pattern
20_pattern
Pattern
background_leni-1
misted
neve_leni-1
misted neve_leni-2
título_natal_leni Mask
 Plugin:
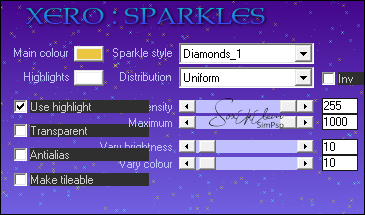
Xero > Sparkle
Colors:
Foreground #8d0e05
Background #edc641
Extra color #ffffff Open the material in psp, duplicate and
close the original
Tutorial: Red Christmas Tree:
1- Open a transparent 250x495 image, paint
it red #b70000
Effects > Plugin Xero > Sparkle: 255 > 1000 > 10 > 10
Main Color red #8d0e05
Highlights white #ffffff
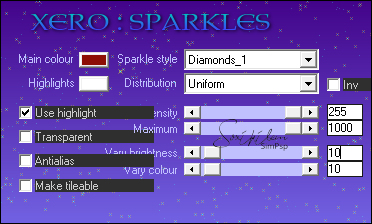 Repeat Effects > Plugin Xero > Sparkle...
2- Layers > New Mask Layer
> From Image > Mask 1.
Layers > Merge > Merge
Group.
Adjust > Sharpness > Sharpen.
Reserve. Golden Christmas Tree:
3- Open another 250x495 transparent
image, paint with the pattern 20_pattern.
Effects > Plugin Xero >
Sparkle: 255 > 1000 > 10 > 10
Main Color yellow #edc641
Highlights white
#ffffff
 Repeat Effects > Plugin Xero > Sparkle... 4- Layers > New Mask Layer
> From Image > Mask 1
Layers > Merge > Merge
Group.
Edit > Sharpness >
Sharpen
Reserve.
5- Open another transparent 800x500
image, paint it red #8d0e05
Effects > Plugin Xero > Sparkle: 255 > 1000 > 10 > 10
Main Color red #8d0e05
Highlights white #ffffff
Repeat Effects > Plugin Xero > Sparkle...
6- Layers > New Layer Raster.
With the Selection Tool, select up to
250px width: 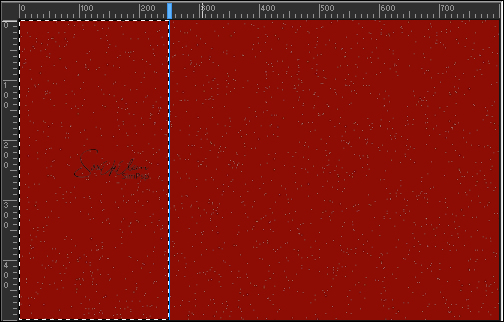 Color this selection with the pattern
background_leni-1
Adjust > Sharpness >
Sharpen.
7- Layers > New Raster Layer
Selections > Modify > Select
Selection Border:  Color this selection with Pattern
Goldfill1.
Adjust > Sharpness >
Sharpen.
Selections > Select None.
8- Layers > Merge > Merge
Down.
Effects > 3D Effects > Drop
Shadow: 8 > 8 > 50 > 30, black color.
9- Edit > Copy in the red tree that
is reserved,
Edit Paste As New Layer
Pick Tool: Position
X 24, Position Y
8
10- Edit> Copy in the golden tree
that is reserved,
Edit Paste As New Layer,
Image > Rezise 97%, resize
all layers
unchecked. Effects > 3D Effects > Drop
Shadow: 1 > 1 > 100 > 1, black color
Pick Tool: Position
X 28, Position
Y12
11- Activates Raster 3 (red tree)
Layers > Duplicate.
Layers > Arrange > Bring to
Top.
Image > Rezise 94% ,
resize all layers
unchecked: Effects > 3D Effects > Drop
Shadow: 1 > 1 > 100 > 1, black color
Pick Tool: Psition
X 34, Position
Y19
12- Layer > Merge > Merge Down,
twice.
Effects > 3D Effects > Drop
Shadow: 8 > 8 > 50 > 30, black color.
13- Enable raster 1
Edit> Copy in the landscape misted,
Edit> Paste As New Layer, move slightly to
the right.
Image resize, in this misted I gave 80%
resize.
Adjust > Sharpness >
Sharpen.
14- Edit > Copy in misted
neve_leni-1
Edit > Paste As New Layer,
Position as print.
Adjust > Sharpness >
Sharpen 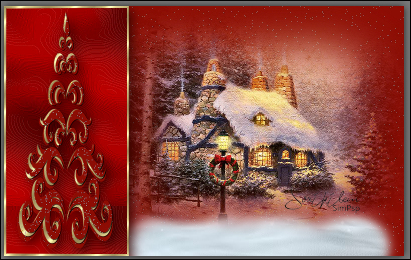 14- Layers > Merge > Merge
All.
15- Image > Add Border
> 1 px, white color #ffffff
Selections > Select All
Image > Add Border > 50 px, red color
#8d0e05
Selections > Invert.
16- Effects > Plugin
Xero > Sparkle: 255 > 1000 > 10 > 10
Main Color red
#b70000
Highlights white
#ffffff
Repeat Effects > Plugin Xero > Sparkle...
Seletions > Invert
Effects > 3D Effects > Drop
Shadow: 0 > 0 > 70 > 30, black color
Seletions > None
17- Edit> Copy in decor of Christmas
sneg98
Edit > Paste As New Layer,
Pick Tool, position in the upper right
corner.
Adjust > Sharpness >
Sharpen.
Effects > 3D Effects > Drop
Shadow: 0 > 0 > 70 > 30, black color
18- Edit > Copy in misted de neve_leni-2
Edit > Paste As New Layer,
Pick Tool, position on the edge...  Adjust > Sharpness >
Sharpen.
19- Edit > Copy in the Main tube.
Edit > Paste As New Layer,
Image > Resize if necessary.
Adjust > Sharpness >
Sharpen.
Position right.
Effects > 3D Effects > Drop Shadow 0 > 0 >
70 > 30, black or as you prefer.
20- Edit > Copy in título_natal_leni
Edit > Paste As New Layer,
Position.
21- Edit > Copy in decor
sneg111.
Edit > Paste As New Layer,
Pick Tool: position near the edge at the
top.
Adjust > Sharpness >
Sharpen
Effects > 3D Effects > Drop
Shadow 0 > 0 > 70 > 30
Layers > Merge > Merge All.
Image > Add Border > 2 px white
color #ffffff
Image > Add Border
> 1 px red color #8d0e05
22- Apply your watermark or
signature. File > Export > JPEG Optimizer...
Tutorial by LeniDiniz
Feel free to send your versions.   
|