|
Material: Main Tube Misted Landscape Decor: PDS_StB- ribbon1 WordArt_Inacia outubro_rosa_inacia
Plugins: Filter Factory Gallery A > Weave ICNet Software > Filters Unlimited 2.0 > Photo Aging Kit > Cracked Paper FM Tile Tools > Blend Emboss
Tutorial:
1-
Choose a tube to be the main tube and
a landscape misted.
Light color for Foreground: #b3c5cc Dark color for Background: #893185
2-
Open
a 1000 x 500 px transparency Style: Linear > Angle: 0 > Repeats: 0
3- Edit > Copy in the landscape misted Edit > Paste as New Layer Effects > Image Effects > Seamless Tiling > Default
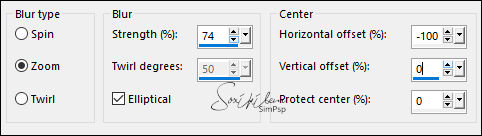
4- Adjust > Blur > Radial Blur:
5- Layers > Duplicate Image > Mirror Horizontal Layers > Properties > General > Opacit: 50% Layers > Merge > Merge Down Effects > User Defined Filter > Emboss 3
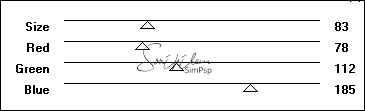
6- Layers > Duplicate Plugin Filter Factory Gallery A > Weave:
7- Image > Resize > 60% > All Layers unchecked Adjust > Sharpness > Sharpen More Effects > 3D Effects > Drop Shadow: 10, 10, 50, 30 > Black Color
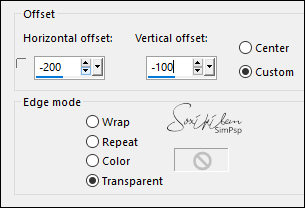
8- Effects > Image Effects > Offset:
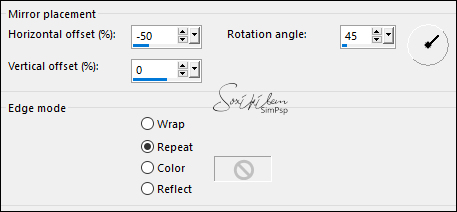
Effects > Reflection Effects > Rotating Mirror:
9- Activate Raster 2 Layer Filters Unlimited 2.0 > Photo Aging Kit > Cracked Paper:
Effects > FM Tile Tools > Blend Emboss: Default.
10- Edit > Copy in the Misted Landscape With Raster 2 active Edit > Paste as New Layer
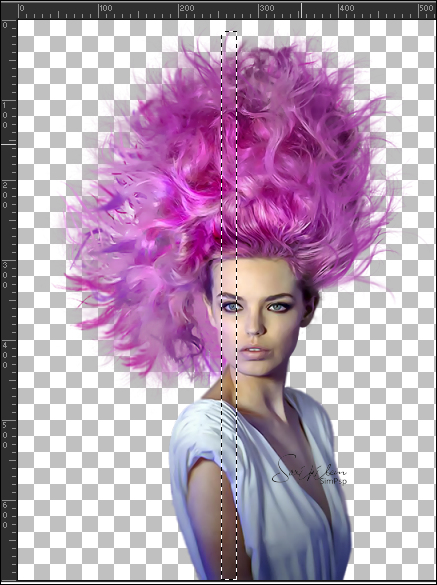
11- Activate Main tube. View > Rulers With the
Selection tool, configured in Rectangle, select 20 px wide, across
Edit > Copy
12- Activate your work Activate Copy of Raster 2 Edit > Paste as New Layer Effects > Distortion Effects > Twirl: 490. Image > Mirror > Mirror horizontal Posicionar um pouco à esquerda Effects > 3D Effects > Drop Shadow: 10, 10, 50, 30 > Black Color
13- Edit copy on the Main Tube Edit > Paste as New Layer Position. Effects > 3D Effects > Drop Shadow: as you prefer.
14- Edit > Copy on the PDS_StB- ribbon1 Edit > Paste as New Layer. Resize as you prefer Position. Effects > 3D Effects > Drop Shadow: as you prefer
15- Edit > Copy on the wordart_inacia Edit > Paste as New Layer. Position. Layers > Merge > Merge All
16- Image > Add Bordes: 1 px dark color 1 px light color 1 px dark color
17- Selections > Select All. Image > Add Bordes: 40 px with any color. Selections > Invert. Invert the gradient colors in use and paint that selection.
18- Filters Unlimited 2.0 > Photo Aging Kit > Cracked Paper, in the opening settings Effects > FM Tile Tools > Blend Emboss Effects > 3D Effects > Buttonize > Default 19- Selections > Invert Effects > 3D Effects < Drop Shadow: 10, 10, 50, 30 Black Color Repeat Drop Shadow with -10, -10, 50, 30 Selections > Select None. Image > Add Bordes > 1px - simmetric - color: #000000
20-
If you want to resize your work.
Tutorial by Inácia Neves'20
CREDITS Main Tube by Beatrice - Misted Landscape by BeaS Ribbon: Chassity - WordArt: Inácia
Feel free to send your versions.
|