  Tutorial by Ana Maria English translation by Soxikibem Original Tutorial
Material 1 Main tube of your choice PDS_StB- ribbon1
fundo-rosa-coracao Masks: Edge canvas 02 / NarahsMasks_1524a
Plugins
Grafit
Plus/ Cross Shadow
AAA
Frame/ Foto Frame
Colors
Foreground
#791a3e Background #dfcbc4 Extra Colors: #FFFFFF, #000000, #404040
Tutorial
1 Open all material, duplicate and close the originals.
Open a 900 X 500px
transparency.
Edit > Copy on the
Selections > None
2 Paint with foreground color Layers > New Mask Layer > from image > mask_Edge_Canvas 02
Layers >
Merge Group
Effects >
3D Effects > Drop Shadow: 0, 0, 60, 50,
Adjust > Sharpness
> Sharpen More. Layers > Merge > Merge Down.
3
Layers >
New raster layer. Paint with background color
Layers
> New Mask Layer > From image > Narahmask_1524a.jpg.
Effects >
3D Effects > Drop Shadow: 0, 0, 60, 30
Color >
#404040. Adjust > Sharpness > Sharpen More.
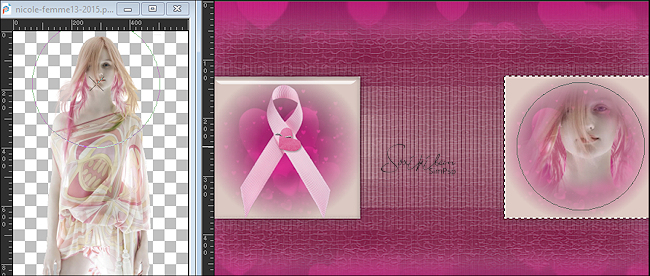
4 Activate the selection tool and select the left frame
Edit > Copy on the tube > Fundo_coracao.png Edit > Paste Into Selection
5 Image > Resize: 65% Edit > Copy > Paste as New Layer.Activate the Move Tool, and position it within the selection on the left
Keep selection
6
In Seting: Clear.
Selections >
None. Layers > Merge > Merge Down.
7
Ative
a
Edit
copy on the tube >
Layers > Merge > Merge Down. Keep Selection.
8 Activate the Clone Brush tool configured as in the print.
I configured according to these dimensions 508x763.
NOTE: Click the mouse with the right side on the part of the image or tube you want to clone, and click on the right square with the left side of the mouse, to clone the chosen part according to your preference .
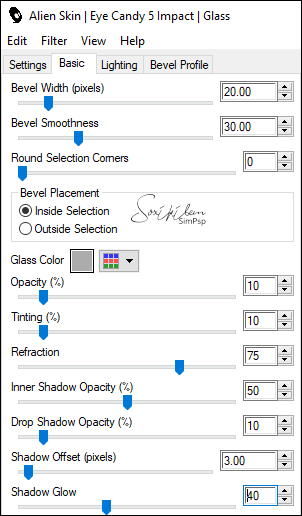
9 Plugin Eye Cand 5: Impact > Glass. Setting: Clear
Selections > Select
None.
10 Edit > Copy on the main tube Edit > Paste As New Layer Position in the center Resize if necessary Adjust > Sharpnes > Sharpen Effects > 3D Effects > Drop Shadow as you prefer Layers > Merge > Merge AllEdit > Copy
11 Image > Add Borders: 2px Foreground
4px
Background 2px Foreground color
12
13
Effects >
AAA Frames > Foto Frame
Selections> Invert
Selections > Select None.
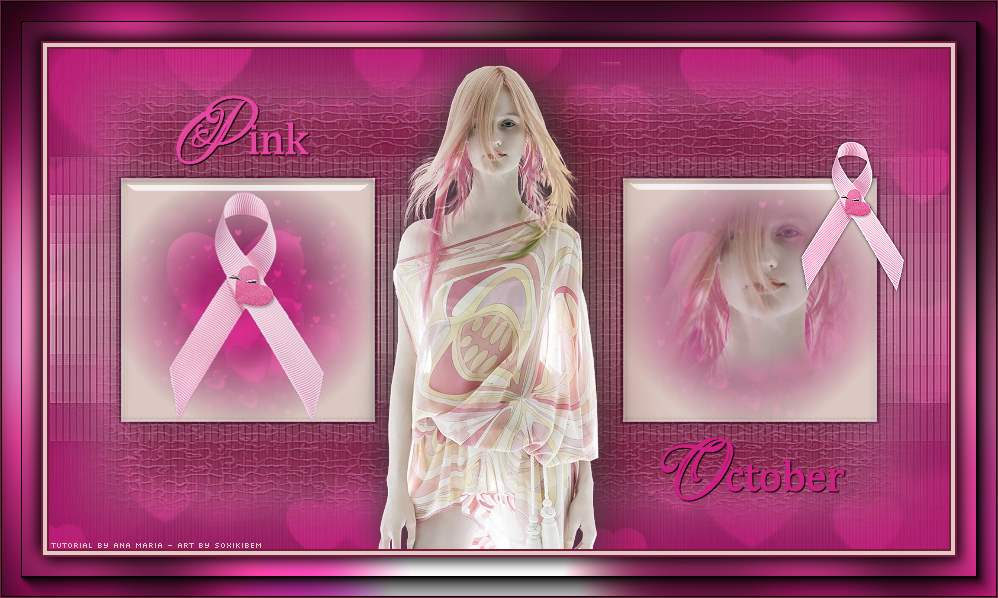
15 Edit > Copy on the title Pink Edit > Paste as New Layer Position at the top as the example tag
16 Edit > Copy on the title Outuber Edit > Paste as New Layer. Position at the bottom as the example tag.
17 Edit > Paste as New Layer.Pick Tool: Position X 793, Position Y 135
18 Apply your watermark or signature. File > Export > JPEG Optimizer.
Tutorial by Ana Maria
Tutorial
by AnaMariaC - SIM-PSP - Art by Soxikibem
Tube by
Nicole - Remaining
material provided by Ana
Maria
Feel free to submit your versions. I will be happy to publish them on our website. .
|