  MATERIAL
1 Main Tube
of your choice
Misted Landscape of your choice
NarahsMasks_1512
Deco_micaela_roberta
Titulo_Micaela_roberta
 Plugins
Bkg Designer sf10
I
Caroline and
Sensibility
Toadies
Xero
Execução
1 -
Open the material on the PSP, duplicate and close the original.
Choose two colors to work with. Foreground
#710d0f
Background
#c68480
2 - Open a
transparent 900x600px image.
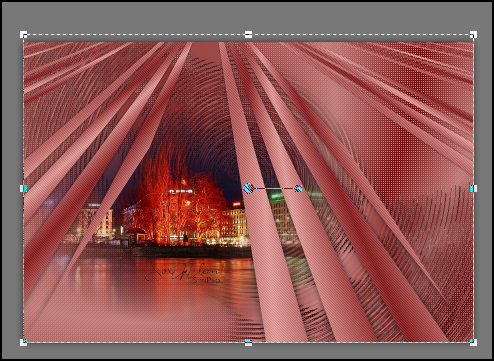
Paint with the Sunburst gradient, Angle 45, Repeats 1. 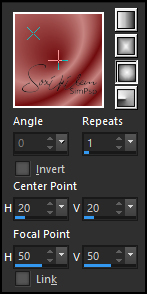
3 - Layers > Duplicate raster 1
Enable raster
1
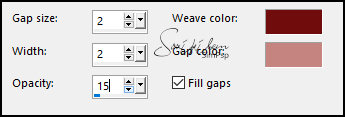
Effects > Texture
Effects > Weave
 4 -
Enable layer Copy of Raster 1.
Effects > Plugin Toadies> Look, Butthead, a TV 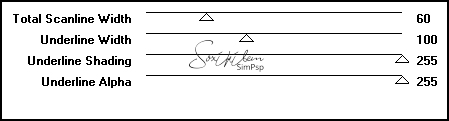 5 - Effects > 3D
Effects > Drop Shadow: 0, 0, 75, 25, black color.
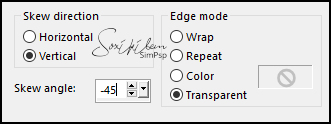
6 - Effects >
Geometric Effects > Skew.
 7- Layers > Duplicate
8 - Enable layer Copy of Raster 1 Effects > Filters Unlimited 2.0 > Bkg Designer sf10 I >Circle Pede 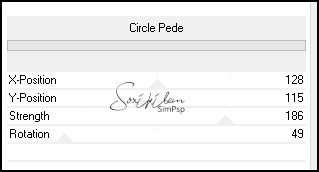 Effects > 3D
Effects > Drop Shadow: 0, 0, 75, 25, black color.
9 - Enable copy 2 of
Raster 1
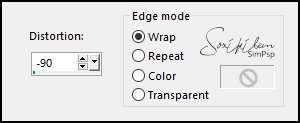
Effects > Geometric
Effects > Perspective Vertical
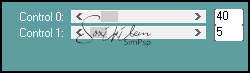
 10 - Plugin Caroline
and Sensibility > CS-D Lines.
 11 - Edit > Copy in the Misted Paisagem.
Edit > Paste a New
Layer.
Image > Resize if necessary.
Position on the left side
Adjust > Sharpness > Sharpen Layer > Arrange > Move Down
12 - Enanble layer copy 2 of Raster 1 With the pick tool, pull up a little so that the effect is at the top edge.
13 - Layers > New Raster
Layer.
Paint this layer with the white color.
Layers > New Mask layer > From
Image: NarahsMasks_1512 .
Layers > Merge > Merge
Group.
With the pick tool, pull down to increase the mask
effect.
 Layers > Duplicate.
Image> Mirror> Mirror
Vertical
Layers > Merge > Merge
Down.
Layers > Properties: Blend Mode Luminance L. 14 - Edit > Copy in the Main Tube.
Edit > Paste a New Layer.
Posicione.
Effects > 3D Effects > Drop Shadow
as you wish.
15 - Layers > Merge >
Merge Visible
Edit > Copy.
Image > Add Borders: 2px, white color.
Selections > Select All.
Image > Add Borders: 50px color background.
16 - Effects > 3D Effects > Drop
Shadow: 0, 0, 80, 25, black color.
17 - Layers > New Raster
Layer.
Selections > Invert.
Edit > Paste Into
Selection.
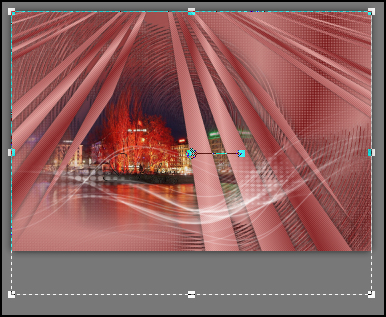
18 - Adjust > Blur >
Motion Blur: Angle 50, Streength 100.
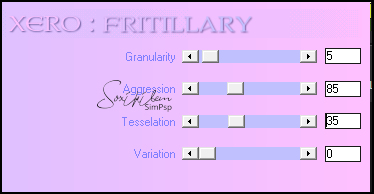
19 -
Keep selected:
Plugin > Xero>
Fritillary
 20 - Layers > Merge > Merge Down. Selections > Select None. Image > Add Borders: 4 px,
white color.
Adjust > Sharpness >
Sharpen
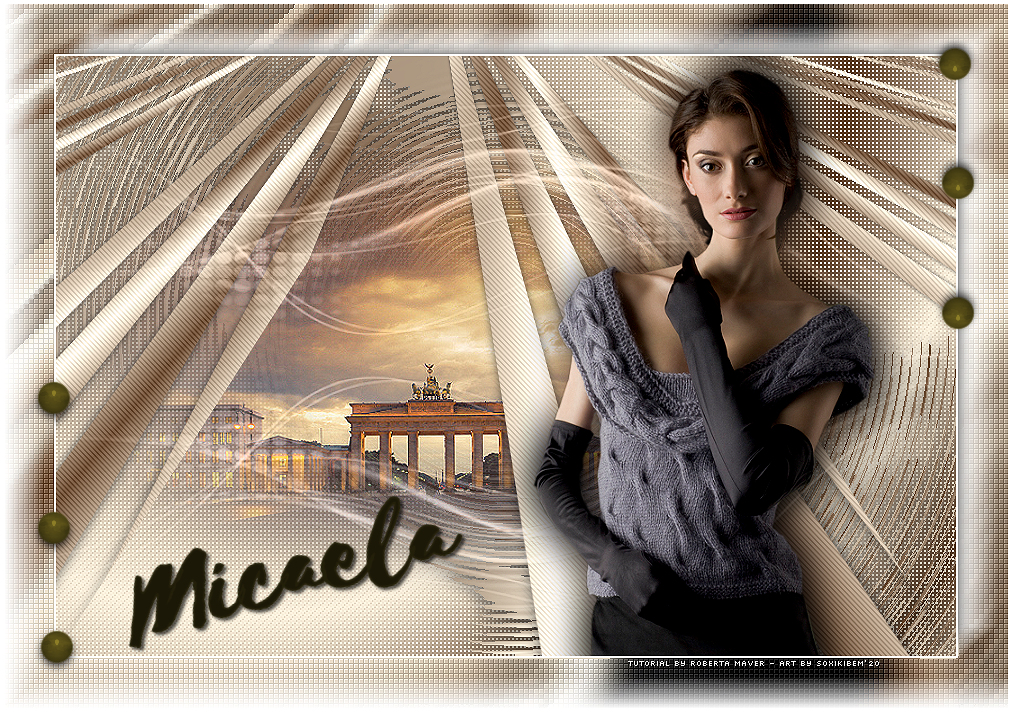
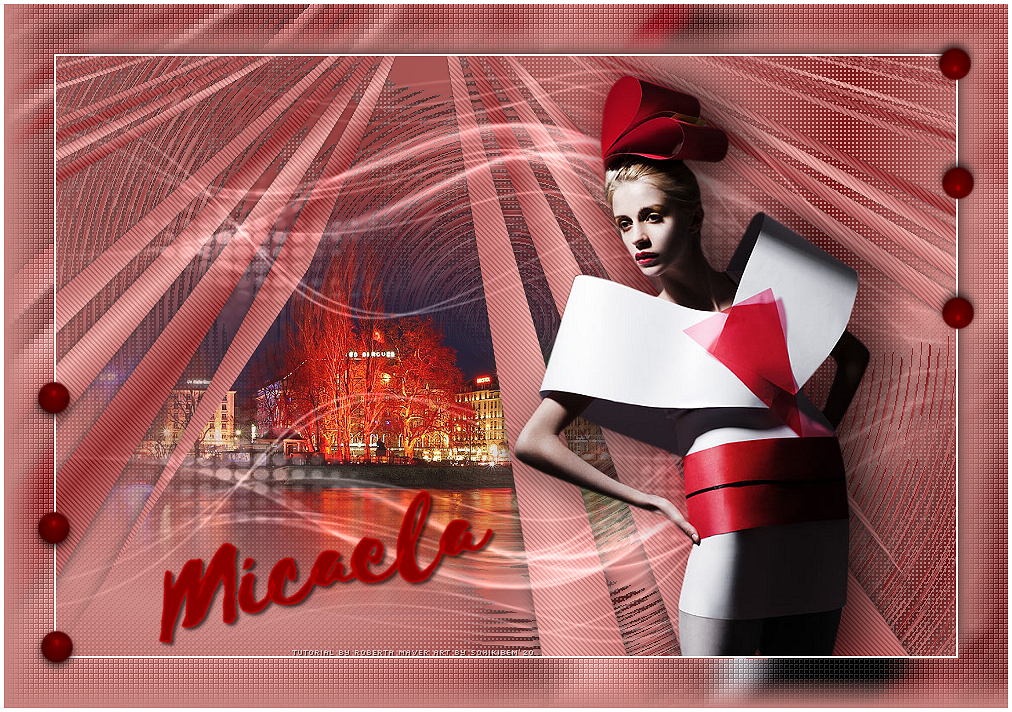
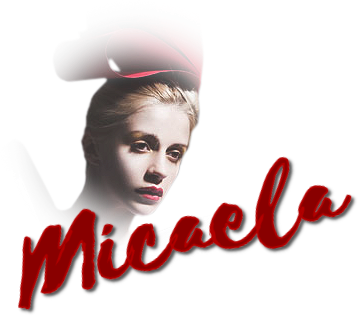
21 - Edit > Copy in the deco_Micaela.
Edit > Paste a New Layer.
22 - Edit > Copy in the titulo_Micaela
or write your own title.
Edit > Paste a New Layer.
Position to your liking
23 - If you wish, resize your work to 900 width. Apply your watermark or signature. File> Export> JPEG Optimizer.
Credits
Tutorial by Roberta Maver - Art by
Soxikibem
Version 1& 2: Tube Principal
& Misted Landscape by Ana
Ridzi
Decos_roberta
NarahsMasks_1512
Tutorial by Roberta Maver'20
Feel free to submit your versions. I will be happy to publish them on our website.
|