|
TRADUÇÕES:
Obrigada aos nossos Tradutores.
********************** Este Tutorial foi elaborado por
CidaBen, qualquer semelhança é mera
coincidência.
**********************
MATERIAL: 1 Tube Principal ou Personagem à sua escolha 1 Tube Decorativo. Selections: Salvar as seleções na pasta Selection do seu PSP. 1 mask: Narah_Mask Outros Materiais by CidaBen
PLUGINS: Mehdi > Sorting Tiles. Filter Factory > Gallery J > TeeWee. Tramages > Tow The Line. Carolaine and Sensibility > CS_Halloween2. Carolaine and Sensibility > CS-DLines. Ap [Lines] > Lines - Silverlining > Dotty Grid . MuRa's Meister > Perspective Tiling.
**********************
**********************
TUTORIAL
2 - Abra uma imagem
transparente de 850x550px.
Layers > Duplicate.
3 - Effects > Plugins > Mehdi > Sorting Tiles.
Adjust > Shapness > Sharpen More.
4 - Selections > Load/Save Selection > Load Selection From Disk: Selection_NewYear2024_CBen1 Selections > Promoter Selection to Layer. Selections > Select None.
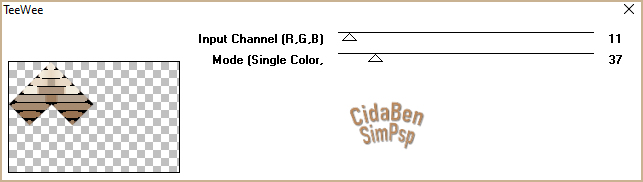
5 - Effects > Plugins > Filter Factory Gallery J > TeeWee
Effects > 3D Effects > Drop Shadow: 0 / 0 / 40 / 20 / Color: #000000.
6 - Ativar a Layer Copy of Raster 1
7 - Selections > Load/Save Selection > Load Selection From Disk: Selection_NewYear2024_CBen2 Selections > Promoter Selection to Layer. Selections > Select None.
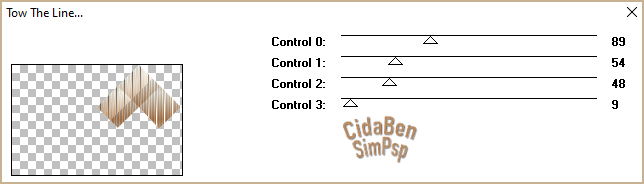
8 - Effects > Plugins > Tramages > Tow The Line.
Effects > 3D Effects > Drop Shadow: 0 / 0 / 40 / 20 / Color: #00000.
9 - Ativar a Layer Copy of Raster 1
10 - Selections > Load/Save Selection > Load Selection From Disk: Selection_NewYear2024_CBen3 Selections > Promoter Selection to Layer. Selections > Select None.
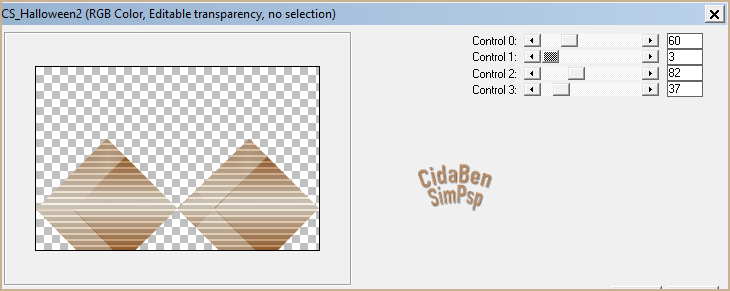
11 - Effects > Plugins > Carolaine and Sensibility > CS_Halloween2.
Effects > 3D Effects > Drop Shadow: 0 / 0 / 40 / 20 / Color: #00000.
12 - Ativar a Layer Copy of Raster 1
13 - Selections > Load/Save Selection > Load Selection From Disk: Selection_NewYear2024_CBen4 Selections > Promoter Selection to Layer. Selections > Select None.
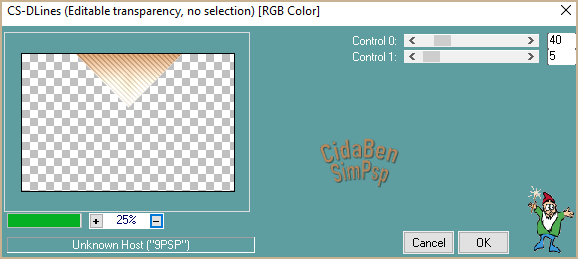
14 - Effects > Plugins > Carolaine and Sensibility > CS-DLines.
15 - Ativar a Layer Copy of Raster 1
16 - Selections > Load/Save Selection > Load Selection From Disk: Selection_NewYear2024_CBen5 Selections > Promoter Selection to Layer. Selections > Select None.
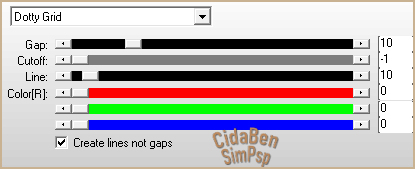
17 - Effects > Plugins > Ap [Lines] > Lines - Silverlining > Dotty Grid .
18 - Ativar a layer do topo (Promoted Selection). Layers > Merge > Merge Down > 4 Vezes. Layers > Duplicate.
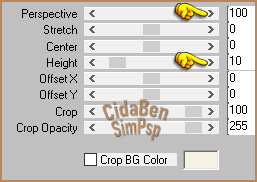
19 - Effects > Plugins > MuRa's Meister > Perspective Tiling.
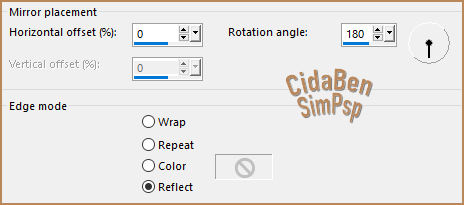
20 - Effects > Reflection Effects > Rotating Mirror.
Adjust > Sharpness > Sharpen.
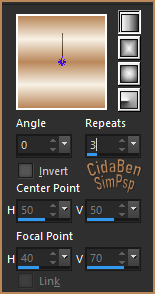
21 - Ativar > Magic Wand Tool > configure como no print:
Selecione a parte
transparente e clique na tecla delete > 8 vezes. Effects > 3D Effects > Drop Shadow: 0 / 0 / 80 / 3 / Color: Background #f7f2e6. Edit > Repeat Drop Shadow.
22 - Ativar a Layer Promoted Selection 4. Layers > Properties > General > Blend mode: Multiply > Opacity 60%.
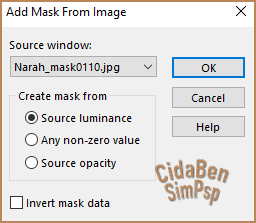
23 - Ativar a Layer do topo (Copy of Promoted Selection 4). Layers > New Raster Layer. Pintar com a cor do Background #f7f2e6. Layers > New Mask Layer > From Image > Narah_mask0110.
Layers > Merge > Merge Group. Effects > Reflection Effects > Rotating Mirror.
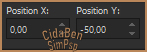
24 - Ativar a Ferramenta Pick Tool. Position X: 0 > Position Y: -50.
Adjust > Sharpness > Sharpen. Layers > Properties > General > Blend mode: Normal > Opacity 75%.
25 - Ativar a Layers Promoted Selection 4. Layers > Merge > Merge Down.
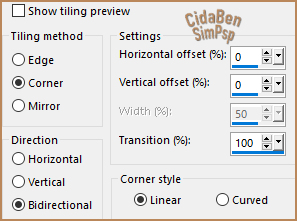
26 - Effects > Image Effects > Seamless Tiling.
27 -
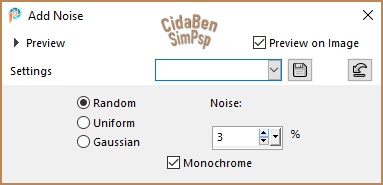
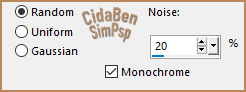
Image > Add Borders > Symmetric: 29 - Adjust > Add/Remove Noise > Add Noise.
Adjust > Sharpness > Sharpen. Selections > Invert Effects > 3D Effects > Drop Shadow: 0 / 0 / 100 / 40 / Color: Background #f7f2e6. Edit > Repeat Drop Shadow. Selections < Select None.
30 - Edit > Copy no Tube
principal. Edit > Repeat Drop Shadow.
31 - Edit > Copy
no Título_NewYear_2024_byCidaBen.
***Para a Versão 2 usei um Blend mode > Luminance(Legacy). Adjust > Sharpness > Sharpen More.
32 - Edit > Copy no Decor
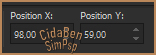
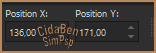
> Callitubes-39natal. Image > Resize > 60% > all layers desmarcado. Layers > Arrange > Move Down. Posicionar logo abaixo do título, conforme o modelo da tag desse Tutorial. ou use a ferramente Pick Tool: Position X 136 > Position Y 171.
Adjust > Add/Remove Noise > Add Noise.
Effects > 3D Effects > Drop Shadow: 1 / 1 / 80 / 10 / Color: Foreground #ba875a. Adjust > Sharpness > Sharpen.
33 - Image > Add Borders > 2px - Color: Cor Background #f7f2e6
34 -
Aplicar sua marca d'água ou assinatura.
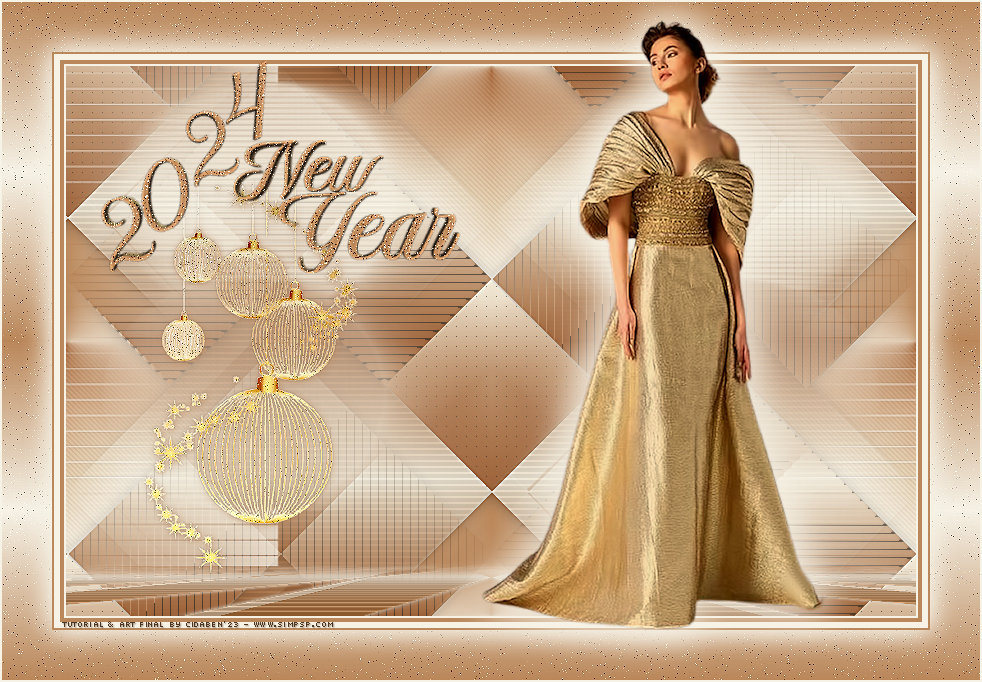
VERSÃO:
Créditos V1 e V2: Formatação, Arte Final e Tutorial by CidaBen Tube Principal & Decorativo: Tubed by Callitubes Mask: by Narah_Mask Outros Materiais: by CidaBen
Sinta-se à vontade para enviar suas versões. Terei todo o prazer em publicá-las em nosso site.
|