|
Tutorial 214 by Sweety Traduzido para o Português pela Moderação do SIM PSP Tutorial Original:
Nota da Autora: - Este tutorial foi feito usando o Corel X12, mas pode ser feito com outras versões do PSP. Dependendo da versão do Corel que você está usando, você pode obter resultados diferentes. Muito obrigado às minhas tradutoras que levam meus tutoriais ao redor do mundo, e aos criadores de tubes sem os quais esse trabalho não seria possível. - Os tubes usados na minha versão são provenientes de vários grupos de compartilhamento e/ou das minhas pesquisas na internet. Eles são de uso exclusivo para este tutorial e não devem ser compartilhados ou usados novamente em seus próprios tutoriais. - Este tutorial é fruto da minha imaginação. Qualquer semelhança com outro tutorial é mera coincidência. - Por favor, não o publique em seus sites, blogs ou fóruns sem a minha permissão. - Não se esqueça de assinar suas criações para evitar plágio, que infelizmente está se tornando cada vez mais comum. - Se você postar suas criações baseadas em um dos meus tutoriais em seus sites, blogs, grupos ou fóruns, lembre-se de incluir o link para este tutorial. - Não
hesite em alterar o modo de mesclagem das camadas de acordo com seus
tubes e cores. - Por favor, não hesite em me avisar se você encontrar qualquer problema com o meu. Obrigado pela compreensão. Divirta-se. Sweety
MATERIAL:
NOTA DA AUTORA SOBRE O MATERIAL: em seus sites/blogs ou em seus tutoriais sem a minha autorização. Infelizmente, algumas pessoas resistem a essa restrição.
PLUGINS: Kiwi’s Oelfilter > ZigZag Filter Unlimited 2.0
Tutorial Traduzido no PSP 2020
01 - Abrir o material no PSP, duplique e feche os originais.
Escolha duas cores do Tube ou Imagem para trabalhar.
Foreground: #495773 Abra uma nova imagem transparente de 950x600.
Selections > Select All. Ative a cópia da imagem
da paisagem. Selections > Select None.
Effects > Plugins > Kiwi’s Oelfilter > ZigZag: De acordo com sua imagem, o efeito pode ser diferente.
Ative a ferramenta Selection Tool > Custom Selection:
Pressione a tecla Delete do teclado ou Edit > Cut. Selections > Select None.
02 - Layers > Duplicate. Image > Mirror > Mirror Vertical. Layers > Merge > Merge Down.
Layers > Duplicate. Image> Resize: 80% - all layers não marcado. Fechar a visibilidade da layer Raster 1.
Com a layer Copy of Raster 1 ativada... Effects > Geometric Effects > Skew:
Teremos esse resultado:
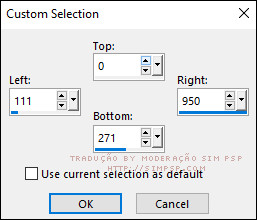
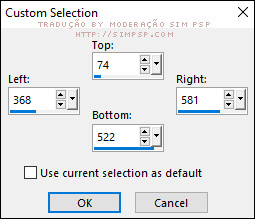
03 - Ative a ferramenta Selection Tool > Custom Selection:
Pressione a tecla Delete do teclado ou Edit > Cut. Selections > Select None.
Com a ferramenta Pick (K) e a régua ativada (View > Rulers) Puxe para a esquerda até cerca de 480 pixels:
Pressione a tecla "M" para desativar a "Ferramenta Pick".
Layers > Duplicate. Image > Mirror > Mirror Horizontal. Layers > Merge > Merge Down.
Ative a ferramenta Pick e configure: Position X: 0,00 - Position Y: 62,00 Pressione a tecla "M" para desativar a "Ferramenta Pick".
Layers > Duplicate. Image > Mirror > Mirror Vertical. Layers > Merge > Merge Down.
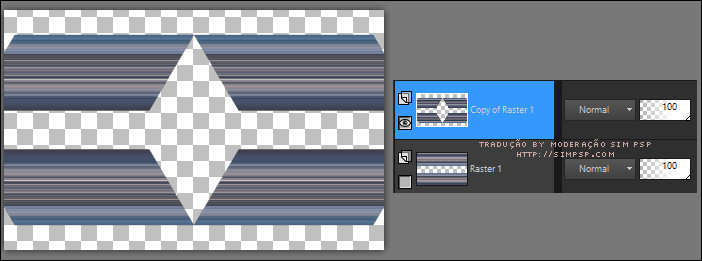
Teremos esse resultado:
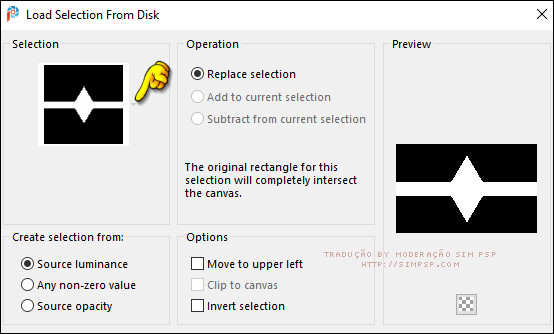
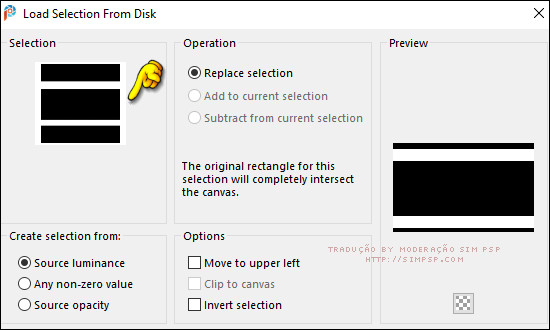
04 - Ativar e abrir a visibilidade da layer Raster 1. Selections > Load/Save Selections > Load Selection From Disk: SELECTION 1 214
Layers > New Raster Layer. Ative a cópia da imagem
da paisagem. Selections > Select None.
05 - Ative a ferramenta Selection Tool > Custom Selection:
Selections > Promote Selection to layer.
Ativar a layer Raster 2 . Pressione a tecla Delete do teclado ou Edit > Cut. Selections > Select None.
Novamente > Selections > Load/Save Selections > Load Selection From Disk: SELECTION 1 214
Effects > Plugins > Filter Unlimited 2.0 > >&<Bkg Designer sf10I> > Crosstich:
Effects > Reflection Effects > Rotating Mirror: Default ou Effects > Reflection Effects > Rotating Mirror:
Selections > Select None.
Teremos esse resultado:
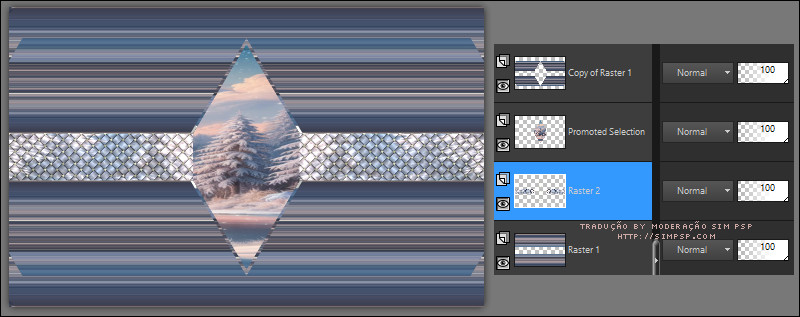
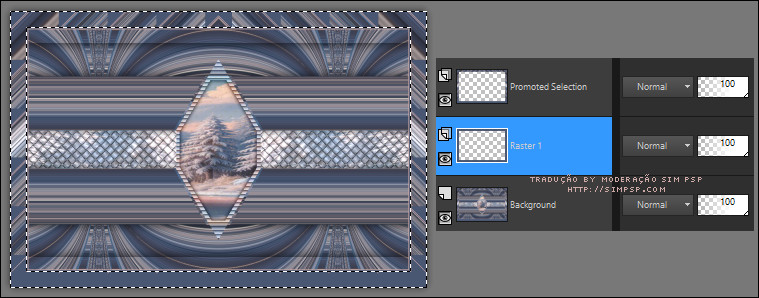
06 - Ainda com a layer Raster 2 ativada... Layers > Arrange > Move Up. Ativar a layer Raster 1. Layers > Arrange > Move Up por 2 vezes.
Nova posição das layers:
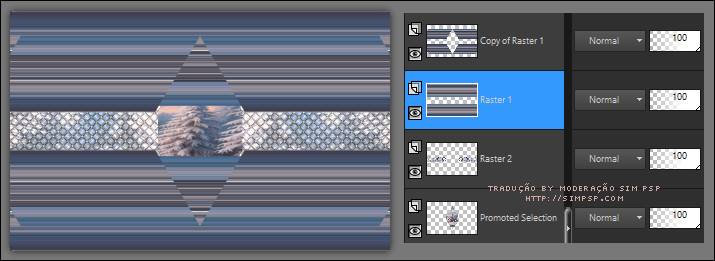
07- Com a layer Raster 1 ativada.... Layers > Duplicate. Effects > Geometric Effects > Circle:
Novamente > Selections > Load/Save Selections > Load Selection From Disk: SELECTION 1 214
Pressione a tecla Delete do teclado ou Edit > Cut.
Ativar a layer Raster 1. Novamente pressione a tecla Delete do teclado ou Edit > Cut.
Selections > Invert... Effects > 3D Effects > Drop Shadow:
Selections > Select None.
08 - Ativar a layer Copy of Raster 1 que está no topo. Selections > Load/Save Selections > Load Selection From Disk: SELECTION 2 214
Pressione a tecla Delete do teclado ou Edit > Cut. Selections > Invert... Effects > 3D Effects > Drop Shadow:
Selections > Select None.
Selections > Load/Save Selections > Load Selection From Disk: SELECTION 2 BIS 214
Ativar a layer Raster 1. Pressione a tecla Delete do teclado ou Edit > Cut. Selections > Select None.
Ativar a layer Promoted Selection. (última layer)
Novamente > Selections > Load/Save Selections > Load Selection From Disk: SELECTION 2 214
Pressione a tecla Delete do teclado ou Edit > Cut. Selections > Select None.
Teremos esse resultado:
09 - Ainda na layer Promoted Selection. Layers > New Raster Layer.
Pintar essa com a cor do Foreground: #495773 Layers > Arrange > Send to Bottom.
Selections > Load/Save Selections > Load Selection From Disk: SELECTION 3 214
Selections > Promote Selection to layer.
Effects > Texture Effects > Blinds:
Layers > Properties > General > Blend Mode: Luminance (L) Selections > Select None.
10 - Selections > Load/Save Selections > Load Selection From Disk: SELECTION 4 214
Layers > New Raster Layer. Layer > Arrange > Move UP.
Pintar a seleção com a cor do Foreground: #495773 Effects > Texture Effects > Blinds:
Selections > Modify > Contract: 10 Pressione a tecla Delete do teclado ou Edit > Cut.
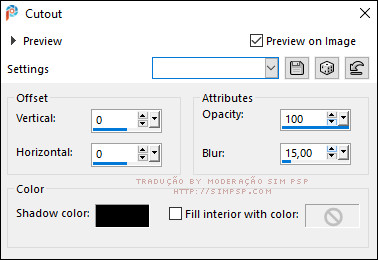
Effects > 3D Effects > Cutout:
Selections > Select None. Layers > Properties > General > Blend Mode: Luminance (L)
11 - Adicionar as bordas: Image > Add Borders > Symmetric: 2 px - Color: Background: #ceaaa7 Image > Add Borders > Symmetric: 2 px - Color: Foreground: #495773 Image > Add Borders > Symmetric: 2 px - Color: Background: #ceaaa7
Selections > Select All. Image > Add Borders > Symmetric: 40 px - Color: Foreground: #495773 Selections > Invert.
Effects > Plugins > Kiwi’s Oelfilter > ZigZag:
Effects > Reflection Effects > Rotating Mirror:
Selections > Promote Selection to layer.
Ativar a layer Background. Layers > New Raster Layer.
Pintar a seleção com a cor do Foreground: #495773 Teremos esse resultado...
Layers > Merge > Merge Down. Selections > Select None.
12 - Fechar a visibilidade da layer Background. Ativar a layer Promoted Selection.
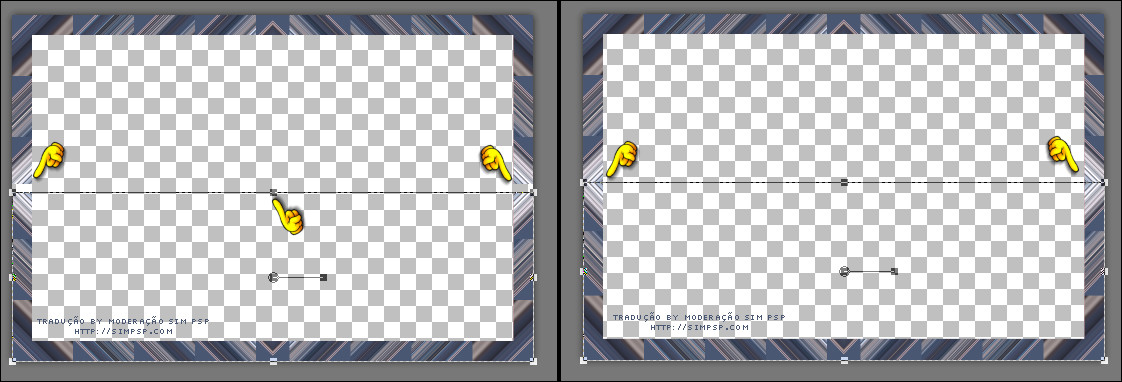
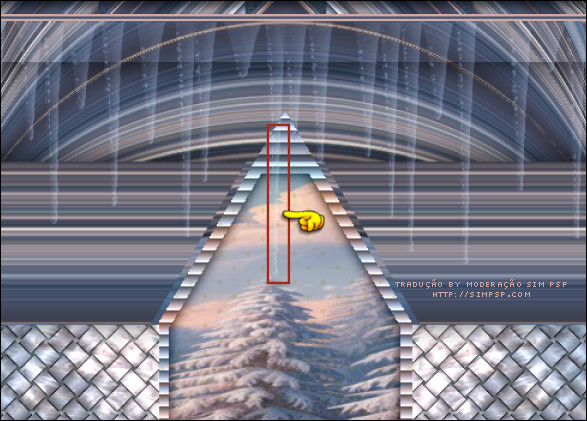
Ative a ferramenta Selection Tool > Custom Selection:
Pressione a tecla Delete do teclado ou Edit > Cut. Selections > Select None.
Layers > Duplicate. Image > Mirror > Mirror Vertical.
Com a ferramenta Pick puxe a linha inferior para cima até encostar as bordas:
Layers > Merge > Merge Down. Abra a visibilidade da layer Background. Mantenha a layer Promoted Selection ativada.
Selections > Load/Save Selections > Load Selection From Disk: SELECTION 5 214
Pressione a tecla Delete do teclado ou Edit > Cut. Selections > Invert...
Effects > 3D Effects > Drop Shadow:
Selections > Select None.
Ativar a layer Background.
Selections > Load/Save Selections > Load Selection From Disk: SELECTION 6 214
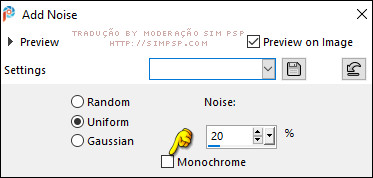
Adjust > Add/Remove Noise > Add Noise:
Layers > Merge > Merge Visibile. Mantenha a seleção...
13- DECORAÇÃO Effects > 3D Effects > Inner Bevel:
Selections > Select None.
Ative a cópia do arquivo DECO PERSO ICICLES VERSION 1 ETAPE LA DECO 214 SWEETY. Edit > Copy e volte ao trabalho. Edit > Paste as New Layer. Ative a ferramenta Pick e configure: Position X: 48,00 - Position Y: 47,00 Pressione a tecla "M" para desativar a "Ferramenta Pick". Com a ferramenta Eraser Tool: Size: 20 - Opacity: 100, apague a parte indicada da decoração:
Layers > Properties > General > Blend Mode: Screen Layers > Duplicate. (Nas outras versões não foi aplicado essa passo)
Outros elementos: Aplicar Drop Shadow à sua escolha nos elementos de decoração.
Ative a cópia do arquivo OCTOBRE 2023 PATRICIA 26 10 23 SWEETY. Edit > Copy e volte ao trabalho. Edit > Paste as New Layer. Image > Mirror > Mirror Horizontal. Image> Resize: 90% - all layers desmarcado. Posicionar à direita, conforme a tag original.
Ative a cópia do arquivo SEPTEMBRE 2024 OURSON ADMIRATIF 26 09 24 SWEETY. Edit > Copy e volte ao trabalho. Edit > Paste as New Layer. Image> Resize: 80% - all layers desmarcado. Posicionar à esquerda, conforme a tag original.
14- Final Image > Add Borders > Symmetric: 2 px - Color: Background #ceaaa7
Image > Resize > By Pixel > Width: 950px, resize all layers marcado. Adjust > Sharpness > Sharpen.
Aplicar marca da autora e sua marca d'água ou assinatura. File > Export > JPEG Optimizer...
Formatação, Arte Final e Tradução by Moderação SIM PSP Tutorial 214 by Sweety Material fornecido no tutorial por Sweety
Versão by Marcinha - Owner SIM PSP
Créditos: Versão e Arte Final by Márcinha Tubes e Imagem: by Adrienne's Designs
Sinta-se à vontade para enviar suas versões para a autora clicando na imagem abaixo:
|