|
Tutorial "Ayumi" by Colybrix Traduzido para o Português pela Moderação do SIM PSP Tutorial Original:
MATERIAL:
PLUGINS: Graphics Plus > Cross Shadow Alien Skin Eye Candy 5 >
Impact CORES: Cor 1: #221f1d - Cor 2: #e0600d - Cor 3: #8a979d - Cor 4: #000000 - Cor 5: #ffffff
Tutorial Traduzido no PSP 2020
Ative a cópia do arquivo Alpha Ayumi. Pintar com a cor 1 do Foreground: #221f1d Selections > Select All.
2 - Ative a cópia do tube femme1034-coly. Edit > Paste Into Selection. Selections > Select None. Effects > Image Effects > Seamless Tiling:
3 - Adjust > Blur > Gaussian Blur: 25
Adjust > Add/Remove Noise > Add Noise:
Pintar com a cor 2 do Background: #e0600d
Layers > New Mask Layer > From image: creation.tine_masque308 5 - Layers > New Raster Layer. Pintar com a cor extra 3: #8a979d
Layers > New Mask Layer > From image: creation.tine_masque301
6 - Effects > 3D Effects > Inner Bevel:
Layers > Properties > General > Blend Mode: Screen
7 - Opcional: Ativar a layer Raster 1. Adjust > Brightness and Contrast > Brightness/Contrast:
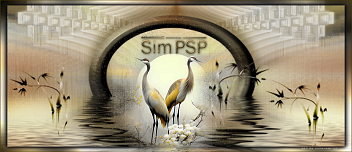
Teremos esse resultado:
8 - Ativar a layer do topo. Layers > New Raster Layer. Selections > Load/Save Selections > Load Selection from Alpha Channel: Sélection #1
Pintar com a cor 1 do Foreground: #221f1d Selections > Select None.
9 - Effects > Plugins > Alien Skin Eye Candy 5 – Impact > Glass: Settings: Clear
Effects > 3D Effects > Drop Shadow: 1 / 1/ 80 / 2, Color: #000000 (Preto) 10 - Selections > Load/Save Selections > Load Selection from Alpha Channel: Sélection #2
Edit > Copy Special > Copy Merged. Layers > New Raster Layer. Edit > Paste Into Selection.
11 - Adjust > Blur > Gaussian Blur: 10
Adjust > Add/Remove Noise > Add Noise:
12 - Effects > Plugins > Graphics Plus > Cross Shadow:
Mantenha a seleção...
13 - Layers > New Raster Layer.
Ative a cópia do tube fleur orange Coly. Edit > Paste Into Selection. Selections > Select None. Image> Resize: 90% - all layers não marcado. Posicione corretamente a imagem dentro da Frame.
Effects > 3D Effects > Drop Shadow: 5 / 5/ 80 / 15, Color:
Background: #e0600d
14 - Layers > Merge > Merge Down. Effects > Plugins > Alien Skin Eye Candy 5 – Impact > Glass: Settings: Clear
Effects > 3D Effects > Drop Shadow: 1 / 1/ 80 / 2, Color: #000000 (Preto)
15 - Layers > New Raster Layer. Selections > Load/Save Selections > Load Selection from Alpha Channel: Sélection #3
Configure o Foreground com a Cor 4 #000000 (Preto) e o Background com a Cor 2: #e0600d
Pinte a seleção com a Cor 4 #000000 (Preto). Selections > Modify > Contract: 3
16 - Pinte a seleção com um gradiente Linear formado pelas cores: Cor 4 #000000 (Preto) e a Cor 2: #e0600d
Effects > Plugins > Alien Skin Eye Candy 5 – Impact > Glass: Settings: Clear
Selections > Select None.
17 - Effects > Reflection Effects > Feedback:
18 - Ative a cópia do tube femme1034-coly.
19 - Opcional: Adjust > Brightness and Contrast > Brightness/Contrast:
-13 / -15 / 80 / 30
20 - Ative a cópia do titulo Titre Ayumi.
Se você quiser escrever seu texto com suas cores (a fonte está no
material)
21 - Effects > 3D Effects > Drop Shadow: 1 / 1/ 80 / 2, Color: #000000 (Preto) 22 - Image > Add Borders > Symmetric: 1px na Cor 2 Background: #e0600d Selections > Select All. Image > Add Borders > Symmetric: 40px na Cor 4: #000000 (Preto)
23 - Effects > 3D Effects > Drop Shadow: 0 / 0/ 100 / 40, Color: Background: #e0600d
Selections > Select None. 24 - Aplicar sua marca d'água ou assinatura. Layers > Merge > Merge
All.
CRÉDITOS: Tutorial "Ayumi" by Colybrix Tradução, Formatação e Arte Final por Moderação SIM PSP Tubes: by Colybrix - Masks: by Tine
Versão by Marcinha - Owner SIM PSP
Créditos: Tubes: AI by Pqna&Alice
Versão by Soxikibem - Owner SIM PSP
Sinta-se à vontade para enviar suas versões para a autora clicando na imagem abaixo:
|