|


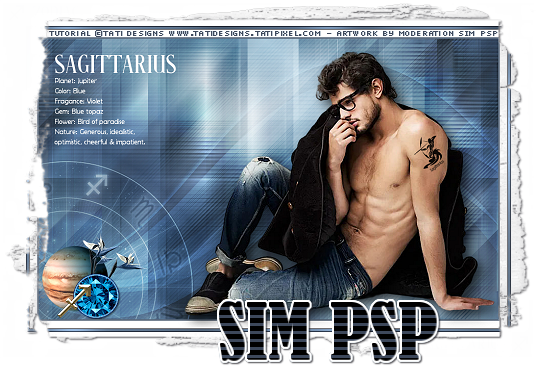
Tutorial Sagittarius by
Tati Designs
Translated into English by SIM PSP Moderation
Original Tutorial:

Author's Note: "Files with initials "TD" (Tati
Designs) are material created by me exclusively for my
tutorials.
DO NOT use them to create your own tutorials. Please read my
Terms of Use (TOU). Thank you."
MATERIAL:
Download the material used here:
PLUGINS
Andrew's Filters 7 > Borders On
Transparency > Eliminate Black
Factory Gallery G > Bevel 1.5
VM 1 > Web Weaver**
VM Experimental > TeeWee
Factory Gallery A > Zoom Out
Mehdi > Weaver
&<Background Designers IV > @Night Shadow**
Alien Skin Eye Candy 5: Impact
** Import this filter into Unlimited 2.0.
IMPORTANT
Modifying or renaming files or removing the watermark is
prohibited.
Please do not use the supplied material outside of this
tutorial.
PREPARATION:
*
Duplicate the tubes. Close the originals.
*
Install the filters in the "plugins" folder of your PSP.
Colors
Choose colors in harmony with your tube.
This is the tutorial palette:

If using other colors, you should change the Blend Mode and
the Opacity of the layers.
TUTORIAL
01- In your Materials palette:
Foreground color (2)
#3d495b
Background color (1) #aac1d1

02- In your material palette, form a Sunburst Gradient
with the colors:

03- Open a new transparent image that is 900 x 550 pixels.
04- Fill the transparent image with the Gradient.
05- Layers > Duplicate.
06- Effects > Complements
> Andrew's Filters 7 > Borders On:

07- Effects > Geometric Effects > Skew:
08- Effects > Reflection Effects > Rotating Mirror:
Default

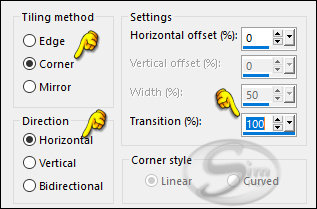
09- Effects > Image Effects > Seamless Tiling:
10- Effects > Plugins >
Factory Gallery G > Bevel 1.5:
Default

11- Effects > Plugins > Filters
Unlimited 2 > VM 1 > Web Weaver:

12- Effects > Plugins >
Experimental VM > TeeWee:

13- Effects > Plugins > Factory Gallery A
> Zoom Out: Default

14- Effects > 3D Effects
> Shadow: 15 > 15 > 50 > 20 > Color: (3) #1f1f25
15- Effects > Plugins >
Mehdi > Weaver:

16- Effects > Image Effects > Seamless Tiling:
Sutter diagonal

17- Layers > Properties > General > Blend Mode:
Overlay
18- Layers > Duplicate.
19- Effects > Geometric Effects > Skew:

20- Layers > New Raster Layer.
Fill in with the color (1) #aac1d1
21- Layers > New Mask Layer > From image:
"TD_Mask_TutoSagittarius"

Layers > Merge > Merge Group.
22- Effects > 3D Effects
> Shadow: 0 > 0 > 50 > 20 > Color: (3) #1f1f25
23-
Layers > Properties > General > Blend
Mode: Overlay
Note: You can make a copy of your work
and do two versions or follow only one.
To make a copy go to: Window> Duplicate
Sagittarius not your horoscope? Do you want to make another
version?
|
Continue here to do "Sagittarius." |
|
Continue here to do "Urban Meeting"
|
|
24- Activate the Layer "Raster
1"
25-
Open the tube "TD_Deco1_TutoSagittarius".
Edit > Copy.
Activate the working image.
Edit > Paste as New Layer.
26- Activate the "Pick" Tool (K) and modify the
positions of X (0.00) and Y (238.00)

Press "M" KEY to disable Pick Tool.
27- Layers > Properties > General:
Blend
Mode: Luminance (L) - Opacity: 40
28- Activate the Layer Group -
Raster 2 (top layer)
29- Open the tube "TD_Deco2_TutoSagittarius".
Edit > Copy.
Activate the working image.
Edit > Paste as New Layer.
30- Activate the "Pick" Tool (K) and modify the
positions of X (6.00) and Y (378.00)
Press "M" KEY to disable Pick Tool.
31- Open the tube "TD_Texto_TutoSagittarius".
Edit > Copy.
Activate the working image.
Edit > Paste as New Layer.
32- Activate the "Pick" Tool (K) and modify the
positions of X (31.00) and Y (31.00)
Press "M" KEY to disable Pick Tool.
|
24- Activate the Layer "Raster 1"
25- Open the tube "Tube_Animabelle_Resized".
Edit > Copy.
Activate the working image.
Edit > Paste as New Layer.
26- Activate the "Pick" Tool (K) and modify the
positions of X (-106.00) and Y (-54.00)

Press "M" KEY to disable Pick Tool.
27- Layers > Properties > General:
Blend
Mode: Overlay - Opacity: 50
28- Activate the Layer Group -
Raster 2 (top layer)
29- Open the tube "TD_Deco1_TutoUrbanMeeting".
Edit > Copy.
Activate the working image.
Edit > Paste as New Layer.
30- Activate the "Pick" Tool (K) and modify the
positions of X (379.00) and Y (00.00)
Press "M" KEY to disable Pick Tool.
31- Open the tube "TD_Texto_TutoUrbanMeeting".
Edit > Copy.
Activate the working image.
Edit > Paste as New Layer.
32- Activate the "Pick" Tool (K) and modify the
positions of X (36.00) and Y (187.00)
Press "M" KEY to disable Pick Tool.
|
33- Image > Add Borders > Symmetric: 1 px -
color (2) #3d495b
Image > Add Borders > Symmetric: 1 px -
color (1) #aac1d1
Image > Add Borders > Symmetric: 1 px -
color (2) # 3d495b
Image > Add Borders > Symmetric: 15 px - color #ffffff
(White)
Image > Add Borders > Symmetric: 1 px -
color (3) #1f1f25
Image > Add Borders > Symmetric: 5 px -
color (4) #5f748c
34- Activate the "Magic Wand" tool: Tolerance and
Feather to 0.
Select the 5 pixels border.
35- Effects > Plugins > Filters
Unlimited 2 > &<Background Designers IV > @Night Shadow:
Default

36- Selections > Select None.
37- Image > Add Borders > Symmetric: 1 px -
color (3) #1f1f25
Image > Add Borders > Symmetric: 50 px -
color (4) #5f748c
|
Continue here to do "Sagittarius."
|
|
Continue here to do "Urban Meeting"
|
|
38-
Open the tube "TD_Deco3_TutoSagittarius".
Edit > Copy.
Activate the working image.
Edit > Paste as New Layer.
39- Open the tube "TD_TubeMan_TutoSagittarius".
Edit > Copy.
Activate the working image.
Edit > Paste as New Layer.
40- Activate the "Pick" Tool (K) and modify the
positions of X (360.00) and Y (99.00)
Press "M" KEY to disable Pick Tool.
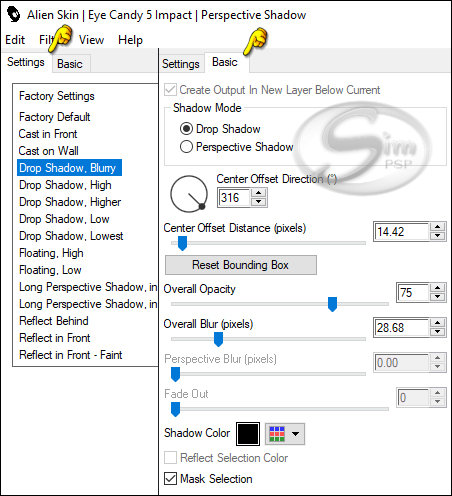
41- Effects > Plugins > Alien Skin Eye Candy 5:
Impact > Perspective Shadow:
42-
Choose a tube that has a visible skin area so that a tattoo
can be placed.
Choose one of the tattoos that is in material.
Copy and paste over the tube.
Don't worry about the white background.
Reset to a suitable size.
Change the Blend Mode to "multiply".


|
38- Open the tube "TD_Deco2_TutoUrbanMeeting".
Edit > Copy.
Activate the working image.
Edit > Paste as New Layer.
39- Activate the "Pick" Tool (K) and modify the
positions of X (15.00) and Y (15.00)
Press "M" KEY to disable Pick Tool.
40- Open the tube "TD_TubeMan_TutoUrbanMeeting".
Edit > Copy.
Activate the working image.
Edit > Paste as New Layer.
41- Activate the "Pick" Tool (K) and modify the
positions of X (553.00) and Y (39.00)
Press "M" KEY to disable Pick Tool.
42- Effects > Plugins > Alien Skin Eye Candy 5:
Impact > Perspective Shadow:
|
43- Image > Add Borders > Symmetric: 1 px -
color (2) #3d495b
44-
Image > Resize > By Pixels > 950 Pixels Width -
Resize All Layers Checked.
45- Adjust > Sharpness > Sharpen.
46- Edit > Copy the "©Tutorial_TatiDesigns"
Edit > Paste as new layer.
*If you need to change the color, you can use the "Color
Changer" tool
Position of your choice.
Add tube © if necessary.
47 - Apply your watermark or signature.
File > Export > JPEG Optimizer.
CREDITS V1 and V2:
Tutorial Sagittarius/Urban Meeting
by Tati Designs
English Translation by Moderation
SIM-PSP
Main Tube: Tubed by
Tati Designs
and
Animabelle
Other materials: by
Tati Designs
Versões by Márcinha - Owner SIM PSP

CREDITS:
Tutorial Sagittarius/Urban Meeting
by Tati Designs
-
Art by Márcinha
-
Main Tube: Tubed by
Pqna&Alice

CREDITS:
Tutorial Sagittarius/Urban Meeting
by Tati Designs
-
Art by Márcinha
-
Main Tube e Misted: Tubed by
Pqna&Alice
Feel free to send your versions.
I will be happy to publish them on our website.

|
Tutorial created by Tati Designs, in
May/2023. Translated into English in
May/23, by the Moderation of SIM-PSP. It cannot be
copied, removed from its place, translated
or used in learning lists or groups without
the author's
prior consent. |
|