|

Tutorial By
CidaBen
English Translation by SIM-PSP moderation
Original Tutorial

Author's Note:
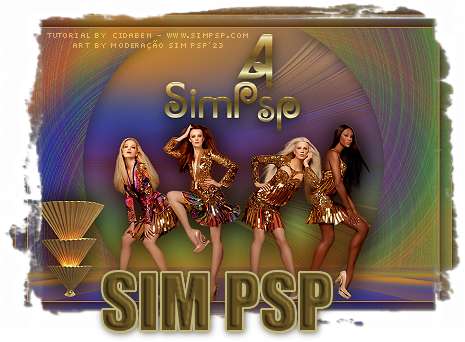
My Tribute to the 4th
Anniversary of the SimPsp Group. Friends are yesterday, today, and
always... Each of these girls represents every year we've spent
together. Being creative is not a hobby, it's a way of life!
CidaBen
"Do what
you do so well that they will want to see it again and bring their
friends."
Walt Disney
*****************************
Thank you to Márcinha
for testing and proofreading the tutorial.
*********************************
MATERIALS:
1 Main Tube or Character of your choice
1 Decorative Tube of your choice
1 mask: Narah_Mask
Gradient: Metal brass
Selections (Save the selections in the Selections folder of your PSP).
Other Materials by CidaBen
PLUGINS:
Mehdi > Wavy 1.1.
Filters Unlimited 2.0 > Déformation > James Bondage.
Alien Skin Eye Candy 5: Impact > Glass.
MuRa's Meister >
Perspectiva Tiling.
Graphic Plus > Cross
Shadow.
*******
This tutorial was created by CidaBen, any resemblance is
purely coincidental.
Tutorial created in PSP 2022.
I want to thank the Tube Artists for providing the tubes.
Without them, this tutorial wouldn't be possible.
When sharing or using the tubes, please keep them intact and don't
remove the credits.
Feel free to change the blends of the layers.
*******
TUTORIAL
1 -
Open the materials in PSP, duplicate them, and close the
originals.
Choose two colors to work with.

Foreground: #753f75
Background: #588f49
3rd color: #324798
4th color: #c58033
2 - Open a new transparent image with dimensions of
900x600px.
3 - Effects > Plugin > Mehdi > Wavy 1.1.

4 - Adjust > Blur > Radial Blur.

5 - Layers > Duplicate.
Effects > Distortion Effects > Wave.

6 - Effects > Texture Effects > Weave.
Wave Color: #ffffff (white)
Gap Color: #588f49 (Background).
Check "Fill gaps".

7 - Effects > Plugin > Filters Unlimited 2.0 > Déformation >
James Bondage.
 
8 - Effects > 3D Effects > Drop Shadow: 1 / 1 / 30 / 50,
Color: #000000.
9 - Layers > Duplicate.
Image > Mirror > Mirror Vertical.
Layers > Properties > General > Blend mode: Overlay > Opacity: 60
Layers > Merge > Merge Down.
10 - Layers > New Raster Layer.
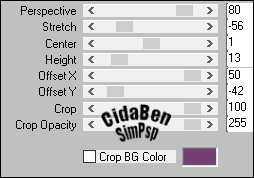
Selections > Load/Save Selection > Load Selection From Disk:
Selection_4a1.
Paint with a golden gradient > Metal brass.

Selection > Select None.
Effects > Plugin > Alien Skin Eye Candy 5: Impact > Glass.

11 - Layers > New Raster Layer.
Selections > Load/Save Selection > Load Selection From Disk:
Selection_4a2.
Paint with a golden gradient > Metal brass.
Selections > Select None.
Effects > Plugin > Alien Skin Eye Candy 5: Impact > Glass.
12 - Layers > Merge > Merge Down.
Pick Tool > X: 267 > Y: -9
13 - Activate Raster 1 layer.
Layers > New Raster Layer.
Paint with a golden gradient > Metal brass.
Layers > New Mask Layer > From Image: NarahsMasks_1783.

Layers > Merge > Merge Group.
Image > Mirror > Mirror Horizontal.
Layers > Properties > General > Opacity 50.
Effects > Edge Effects > Enhance.
14 - Activate Raster 1 layer.
Layers > Duplicate.
Layers > Arrange > Bring To Top.
15 - Effects > Plugins > MuRa's Meister > Perspectiva Tiling.
16 - Effects > Reflection Effects > Rotating Mirror.

17 - With the Magic Wand Tool > Tolerance 0 > Feather 30,
select the transparent part.
Press the Delete key on the keyboard 3 times.
Selections > Select None.
Adjust > Sharpness > Sharpen More.
***Set the Feather of the Magic Wand Tool back to 0.
Effects > 3D Effects > Drop Shadow: 1 / 1 / 100 / 30, Color:
#c58033 (4th color).
18 - Effects > Graphic Plus > Cross Shadow.

19 - Edit > Copy the Main Tube.
Edit > Paste As New Layer.
Image > Resize if necessary, in the material's tube, the resize was
68%.
Image > Mirror > Mirror Horizontal.
Position it in the center.
Adjust > Sharpness > Sharpen.
Effects > 3D Effects > Drop Shadow > as desired.
20 - Edit > Copy the Decor Tube.
Edit > Paste As New Layer.
Image > Resize if necessary, in the material's decor, the resize was
50%.
Adjust > Sharpness > Sharpen.
Position it as desired.
Effects > 3D Effects > Drop Shadow > as desired.
21 - Hide the visibility of the Tube, Decor, and Title layers.
Edit > Copy Special > Copy Merged.
Restore the visibility of the three layers.
22 - Image > Add Borders > Symmetric: 2px, Color 4 (#c58033).
Selections > Select All.
Image > Add Borders > Symmetric: 25px, any color.
Selections > Invert.
Edit > Paste Into Selection.
23 - Adjust > Blur > Gaussian Blur: 10.
24 - Selections > Invert.
Effects > 3D Effects > Drop Shadow: 0, 0, 100, 40, black color
(#000000).
Selections > Select None.
25 - Image > Add Borders > Symmetric: 2px, Color 4 (#c58033).
Selections > Select All.
Image > Add Borders > Symmetric: 30px, any color.
Selections > Invert.
Edit > Paste Into Selection.
26 - Adjust > Blur > Gaussian Blur: 10.
Adjust > Add/Remove Noise > Add Noise.

27 - Selections > Invert.
Effects > 3D Effects > Drop Shadow: 0, 0, 100, 40, black color
(#000000).
Selections > Select None.
28 - Image > Add Borders > Symmetric: 2px, Color 4 (#c58033).
29 - Resize your work by 95%.
30 - Apply your watermark or signature.
File > Export > JPEG Optimizer.
Version by Márcinha -
Owner SIM PSP
Credits:
Formatting, Final Art, and
English Translation by Moderation
SIM-PSP
Tutorial by
CidaBen
Main Tube:
Tubed by
Luz Cristina
Decorative Tube: Tubed by
Pqna&Alice
Mask: by
Narah
Other Materials: by
CidaBen
Version Credits:
Main Tube and Decorative Tube:
Tubed
by
Pqna&Alice
Feel free to submit your versions.
I will be delighted to publish them on our website.

|
Tutorial created by
CidaBen
in
June/2023. Translated into English in
June/2023, by the
Moderation of
SIM-PSP. It cannot be copied,
removed from its place, translated or used in learning
lists or groups without the author's prior consent. |
|