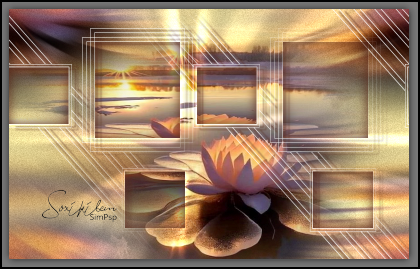
|
Tutorial by Soxikibem English Translation by Moderation SIM-PSP Original Tutorial
MATERIALS:
PLUGINS: Alien Skin Eye Candy 5 Impact > Backlight Flaming Pear > Flood Graphic Plus > Cross Shadow Toadies > Banding Suppress Noise
This tutorial was written by Soxikibem, any resemblance is
purely coincidental.
Color 3: #ffffff Color 4: #000000
2 - Open a
transparent image of 800x500px.
3 - Selections > Select All. Edit > Copy the Misted Landscape. Edit > Paste Into Selections. Selections > Select None. Effets > Image Effects > Seamless Tiling: Default.
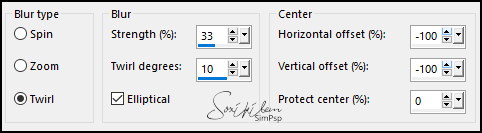
4 - Adjust > Blur > Radial Blur.
5 - Effects > Plugins > Toadies > Banding Suppress Noise: 85.
6 - Layers > New Raster Layer. Paint with color 3 (white). Layers > New Mask Layer > From Image: P&A_Mask051. Layers > Merge > Merge Group.
7 - Layers > New Raster Layer. Layers > Arrange > Move Down. Selections > Load/Save Selections > Load Selection from Disk: Selection4th_Xiki1. Edit > Copy the Misted Landscape. Edit > Paste Into Selections. Adjust > Sharpness > Sharpen.
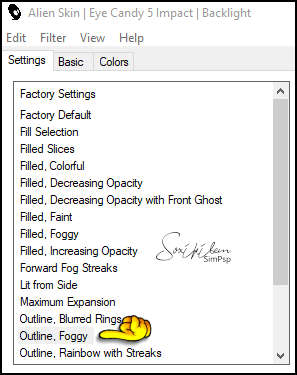
8 - Layers > New Raster Layer. Layers > Arrange > Move Down. Plugin Alien Skin Eye Candy 5 Impact > Backlight: Outiline, Foggy
Layers > Properties > Genera > Blend Mode: Dodge - Opacity: 40%.
9 - Activate the Top Layer. Layers > New Raster Layer. Effects > 3D Effects > Cutout, with the foreground color.
Selections > Select None.
10 - Activate the Layer Group - Raster 2. Effects > 3D Effects > Drop Shadow, with the foreground color.
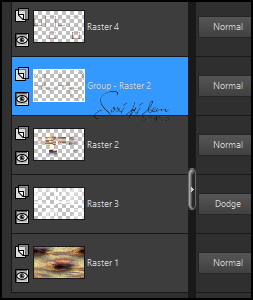
11 - The position of the layers should be as follows:
12 - Activate the Raster 1 layer. Edit > Copy the Misted Landscape. Edit > Paste as New Layer. Position according to the model:
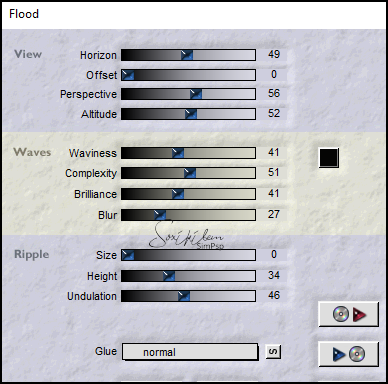
13 - Activate the Raster 1 layer. Layers > Duplicate. Effects > Plugins > Flaming Pear > Flood:
Layers > Properties > General > Blend Mode: Overlay - Opacity: 80%.
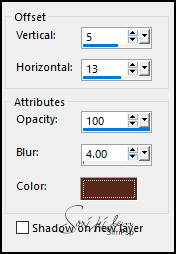
14 - Activate the Top Layer. Edit > Copy the tube 040AnimaisByPqnaAlice Edit > Paste as New Layer. If you are using the material's tube, position it using the Pick Tool: Position X: 29 - Position Y: 49. Effects > 3D Effects > Drop Shadow: -2, 5, 50, 8, Color: #000000 (Black)
15 - Layers > New Raster Layer. Selections > Load/Save Selections > Load Selection From Disk: Selection4th_Xiki2. Edit > Copy Special > Copy Merged. Edit > Paste Into Selection.
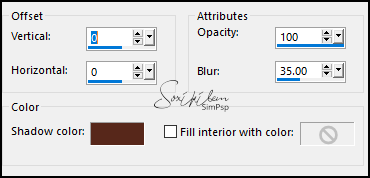
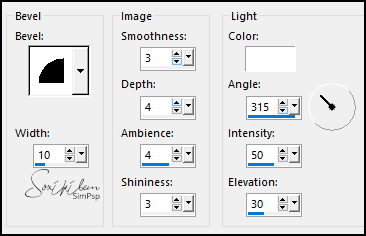
16 - Effects > 3D Effects > Inner Bevel:
17 - Layer > Duplicate twice (we will have 3 layers of this effect). Activate the Raster 7 layer. Adjust > Add/Remove Noise > Add Noise: Random, 10%, monochrome checked.
Activate the Copy of Raster 7 layer. Adjust > Add/Remove Noise > Add Noise: Random, 15%, monochrome checked.
Activate the Copy (2) of Raster 7 layer. Adjust > Add/Remove Noise > Add Noise: Random, 20%, monochrome checked.. Selections > Select None.
18 - Activate the Raster 7 layer. Effects > 3D Effects > Drop Shadow: 0, 0, 100, 10, Color; #000000 (Black), with "Shadow on new layer" option checked.
19 - Activate the Top Layer. Edit > Copy the title SimInfinityLove_ByXiki. Edit > Paste as New Layer. Activate the Pick Tool: Position X 543, Position Y 347.
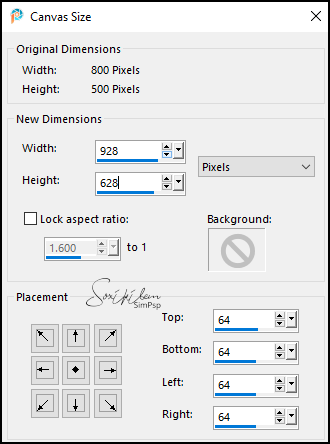
20 - Edit > Copy Special > Copy Merged. We will paste this Copy Merged layer into one of the borders that we are going to create. Layers > New Raster layer. Image > Canvas Size.
21 - Paint with the foreground color. Selections > Select All. Selections > Modify > Contract: 1. Press the Delete key on
the keyboard.
22 - Selections > Modify > Contract: 30. Press the Delete key on the keyboard. Effects > 3D Effect > Drop Shadow: 0, 0, 100, 30, foreground color, uncheck "Shadow on new
layer". 23 - Paint the selection with the foreground color. Selections > Modify > Contract: 1. Press the Delete key on the keyboard.
24 - Layers > New Raster Layer. Edit > Paste Into Selection. Adjust > Blur > Gaussian Blur: 10. Selections > Modify > Contract: 15. Press the Delete key on the keyboard.
25 - Layers > New Raster Layer. Paint the selection with the foreground color. Selections > Modify > Contract: 1. Press the Delete key on the keyboard.
26 - Paint the selection with the background color. Selections > Modify > Contract: 10. Press the Delete key on the keyboard.
27 - Paint the selection with the foreground color. Selections > Modify > Contract: 6. Press the Delete key on the keyboard.
28 - Effects > 3D Effects > Cuttout: Shadow color: Foreground color
Selections > Select None.
29 - Activate the Raster 10 layer. Effects > Plugins > Graphic Plus > Cross Shadow:
30 - Layer > Duplicate twice (we will have 3 layers of this borders). Activate the Raster 10 layer. Adjust > Add/Remove Noise > Add Noise: Random, 10%, monochrome checked.
Adjust > Add/Remove Noise > Add Noise: Random, 15%, monochrome checked.
Activate the"Copy (2) of Raster 10" layer . Adjust > Add/Remove Noise > Add Noise: Random, 20%, monochrome checked.
31 - Activate the Raster 11 layer. Edit > Copy the tube 1068MulherByPqnaAlice. Edit > Paste as New Layer. Position to the left of
the artwork.
32 -
Add a new layer and apply your watermark or signature. 33 - Let's take our work to the Animation program. Hide the visibility of the layers: Copy of Raster 10, Copy (2) of Raster 10, Copy of Raster 7, Copy (2) of Raster 7. Edit > Copy Special > Copy Merged. In the Animation program, go to Edit > Paste > As New Animation.
34 - Go back to the PSP program. Open the visibility of the layers: Copy of Raster 10, Copy of Raster 7. Hide the visibility of the layers Raster 7 and Raster 10 Edit > Copy Special > Copy Merged. In the Animation program, go to Edit > Paste > After Current Frame.
35 - Go back to the PSP program. Open the visibility of the layers: Copy (2) of Raster 10, Copy (2) of Raster 7. Hide the visibility of the Copy of Raster 10 and Copy of Raster 7 layers. In the Animation program, go to Edit > Paste > After Current Frame.
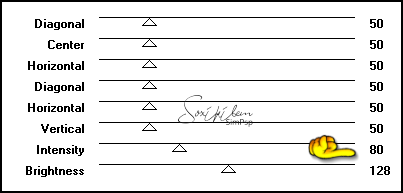
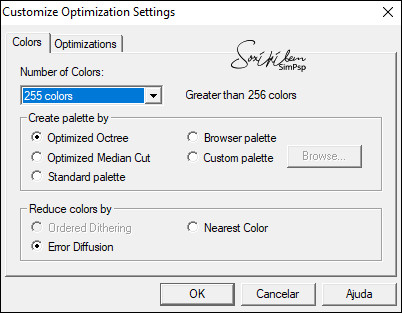
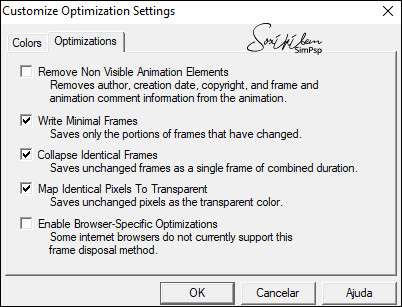
36 - Edit > Select All. Animation > Frame Properties: 10.
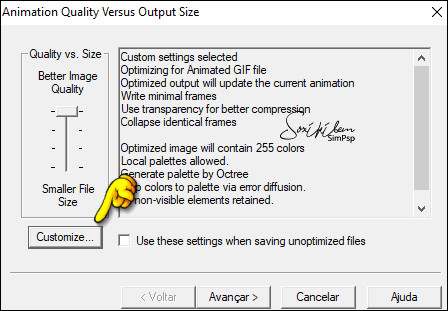
37 - Save your work by going to File > Save:
Versão:
Credits: Other Materials: by Soxikibem
Feel free to send your versions.
|