|
TRADUÇÕES:
Obrigada aos nossos Tradutores
Este Tutorial foi elaborado por AnaMariaC e Márcinha, qualquer semelhança é mera coincidência. Tutorial testado e revisado por CidaBen.
MATERIAL: 1 Imagem Personagem à sua escolha Outros Materiais by AnaMariaC
PLUGINS:
Effects > Plugins > Alien Skin Eye Candy 5: Impact > Glass
Tutorial elaborado no PSP 2020
02 - Abra a cópia do arquivo AlphaChannel_Circle. Pinte com o gradiente > Linear > cores do Foreground e Background.
03 - Selections >
Select All.
04 - Effects > Image Effects > Seamless Tiling:
05 - Adjust > Blur > Gaussian Blur: Radius: 10
Effects > Plugins > Flaming Pear > Flexify 2
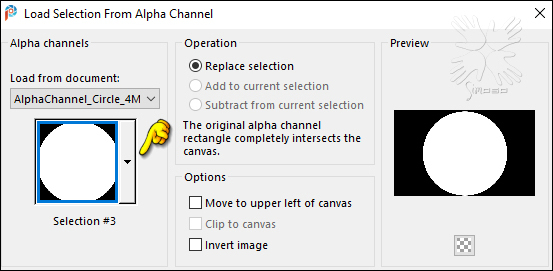
08 - Effects > Edge Effects > Enhance More. Selections > Load/Save Selections > Load Selection From Alpha Channel: Selection #1
09 - Selections > Promote
Selection to Layer. Effects > Reflection Effects > Rotating Mirror:
10 - Effects > Plugins > Alien Skin Eye Candy 5: Impact > Glass.
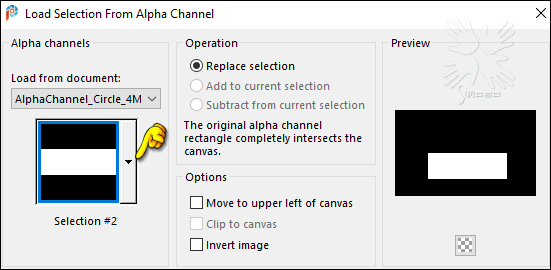
11 - Selections > Load/Save Selections > Load Selection From Alpha Channel: Selection #2
Pressione a tecla Delete do teclado. Selections > Invert. Selections > Promote
Selection to Layer. Image > Mirror > Mirror Vertical. Layers > Merge > Merge Down.
12 - Layers > New Raster Layer. Selections > Load/Save Selections > Load Selection From Alpha Channel: Selection #3
Aplique novamente o Plugins > Alien Skin Eye Candy 5: Impact > Glass:
13 - Selections > Select None. Teremos esse resultado:
14 - Layers > Merge > Merge Down. Effects > Image Effects > Seamless Tiling: Default
15 - Ativar a layer Copy of Raster 1.
16 - Effects > Image Effects > Seamless Tiling: Default
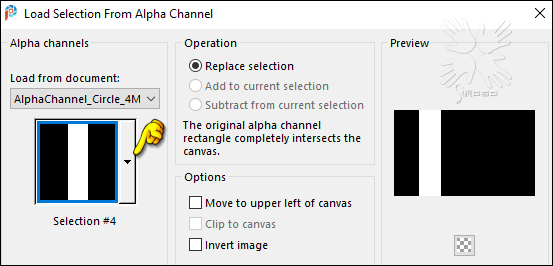
Selections > Load/Save Selections > Load Selection From Alpha Channel: Selection #4
18 - Selections >
Promote Selection to Layer.
Image > Mirror > Mirror Horizontal. Layers > Merge > Merge Down. Adjust > Sharpness > Sharpen More. Layers > Properties > General > Blend Mode: Screen - Opacity: 100
Teremos esse resultado:
20 - Ativar a
laye Raster 1.
21 - Effects > Reflection Effects > Rotating Mirror:
Pressionar a tecla Delete
por 5 vezes
e volte o Feather para zero. Adjust > Sharpness >
Sharpen More.
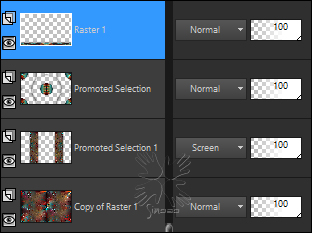
23 - Confira as Layers:
24 - Edit > Copy Special > Copy Merged. Image > Add Borders > Symmetric: 1px - color: #000000. Selections > Select All.
25 - Image > Add Borders > Symmetric: 50px - com qualquer cor. Selection > Invert. Edit > Paste Into Selection.
26 - Adjust > Blur > Gaussian Blur: 20 Selection > Invert. Selections > Promote Selection to Layer. Selections > Select None.
27 - Selections > Load/Save Selections > Load Selection From Alpha Channel: Selection #1
28 - Selections > Promote Selection to Layer. Selections > Select None. Layers > Arrange > Move Down. Effects > Image Effects > Seamless Tiling: Default
Effects > 3D Effects > Drop Shadow: Color: #000000
Teremos esse resultado:
29- Ativar layer Promoted Selection. Effects > 3D Effects > Drop Shadow: Color: #000000
30 - Ativar
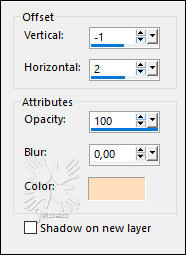
a cópia do arquivo TubeWoman_TubedAnaMaria. Edit > Paste As New Layer. Posicionar à esquerda. Effects > 3D Effects >
Drop Shadow: 0 / 0 / 100 / 25 / Color: #000000 31 - Ativar a cópia do arquivo TituloCircle_byAnaMaria-Marcinha Edit > Copy. Volta a imagem que estamos trabalhando... Edit > Paste As New Layer. Effects > 3D Effects > Drop Shadow: Color: cor do Background
32 - Finalizar: Image > Add Borders > Symmetric: 1px - color: #000000.
33 - Se você desejar
redimensione seu trabalho.
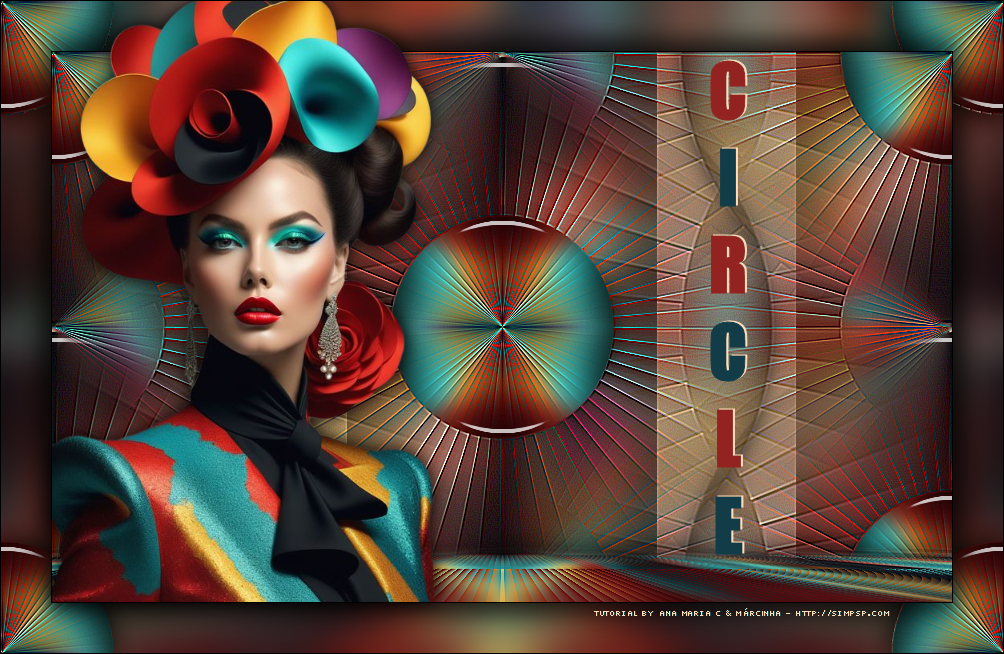
Créditos Versão Principal: Tutorial "Circle" by AnaMariaC & Márcinha Formatação e Art Final by Márcinha Tube Principal: Tubed by AnaMariaC Brasil, Andradina (SP) & Içara (SC) - 02/11/2024
Versão by AnaMariaC:
Créditos: Tube Principal: Tubed by AnaMariaC
Versão by Márcinha:
Créditos: Tube Principal: Tubed by Pqna&Alice
Sinta-se à vontade para enviar suas versões. Terei todo o prazer em publicá-las em nosso site.
|