|
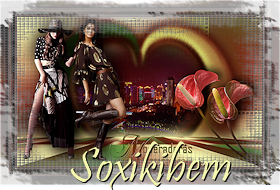
O SimPsp tem o privilégio de ter CidaBen e Roberta Maver como moderadoras. Duas meninas que sempre apresentam lindos trabalhos em seus tutoriais e sempre prontas a apoiar e ajudar no crescimento do grupo. O nosso muito obrigada pelo lindo trabalho minhas queridas.
TRADUÇÕES:
Obrigada aos nossos tradutores!
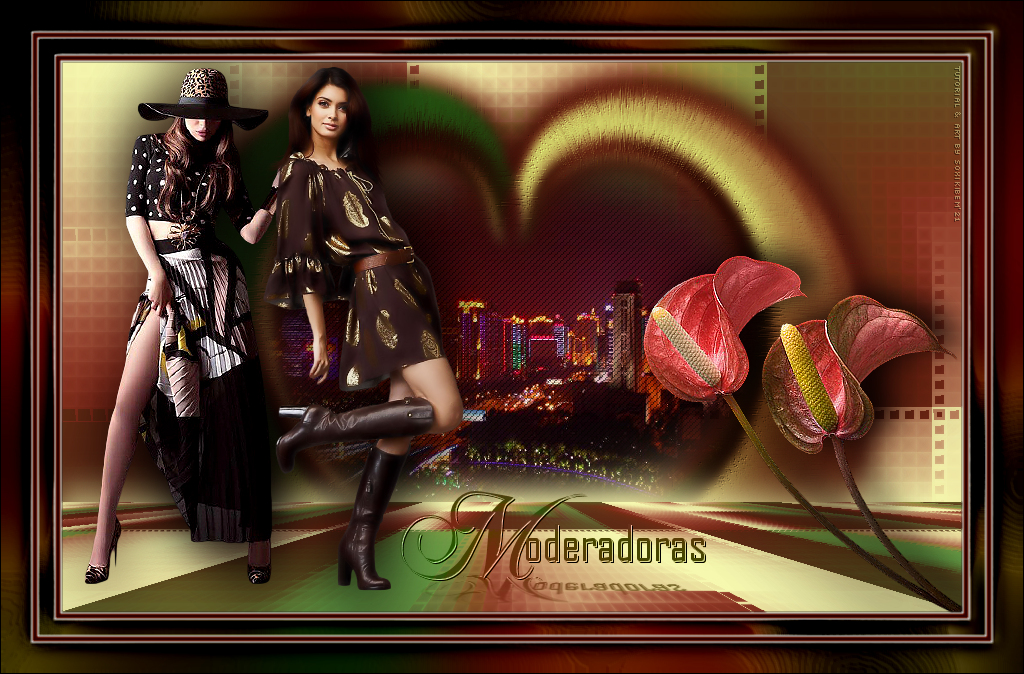
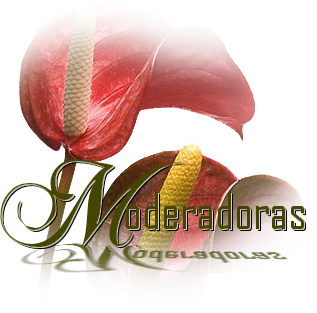
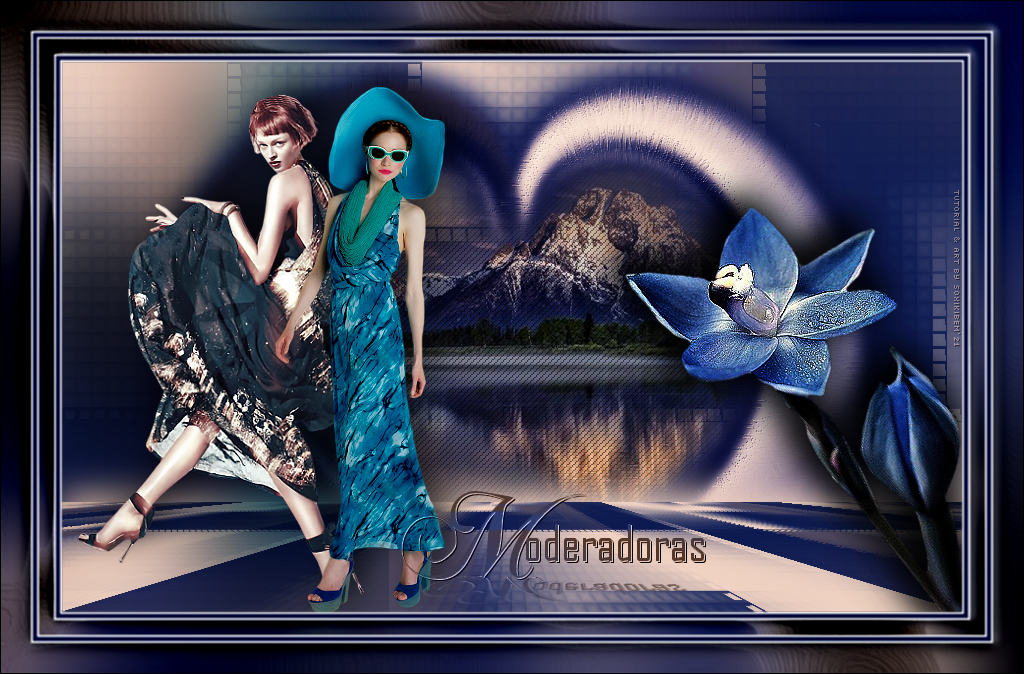
MATERIAL 1 Tube à sua escolha 1 Misted Paisagem à sua escolha 1 Tube Decorativo à sua escolha TituloModeradorasBySoxikibem
Plugins AAA Filters Mehdi Mura's Meister FM Tile Tools
Execução
1 - Abrir o material no PSP, duplique e feche os originais. Escolha três cores para trabalhar: Cor 1- Foreground: #609a44 Cor 2 - Background: #f6f8af Cor 3 - #802d1b Cor extra: #FFFFFF
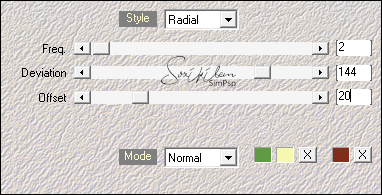
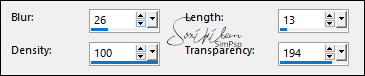
2 - Abra uma transparência de 900x550px. Effects > Plugins Mehdi > Wavy Lab: Sequência das cores: 1,2 e 3.
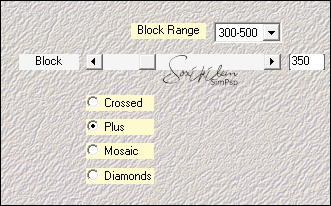
3 - Effects > Plugins Mehdi > Sorting Tiles:
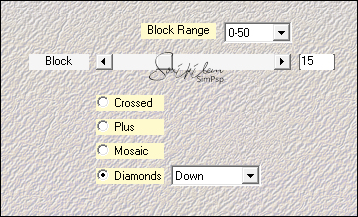
4 - Effects > Plugins Mehdi > Sorting Tiles:
5 - Layers > Duplicate. Effects > Plugins Mura's Meister > Perspective Tiling:
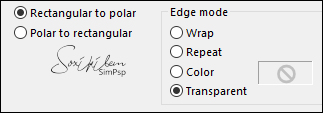
6 - Layers > Duplicate. Effects > Distortion Effects > Polar Cordinates.
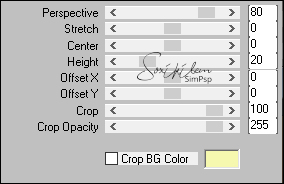
7 - Effects > Plugins Mura's Meister > Pole Transform:
Layers > Arrange > Move Down. Com a ferramenta Pick Tool, posicionar: Position X 87, Position Y 14.
8 - Selections > Select All. Selections > Float. Selections > Defloat. Selections > Modify > Feather: 10. Selections > Invert. Aperte a tecla Delete do seu teclado 5 vezes. Selections > Select None.
9 - Effects > Texture Effects > Fur.
10 - Effects > Plugins FM Tile Tools > Blend Emboss: Default. Effects > 3D Effects > Drop Shadow: 0, 0, 100, 50, com a cor 3. Layers > Duplicate. Layers > Properties > General > Blend Mode: Multiply ou outro que preferir.
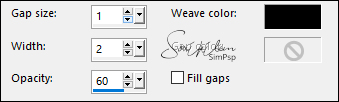
11 - Ativar a layer Raster 1. Edit > Copy no Misted Paisagem. Edit > Paste as New Layer. Efects > Texture Effects > Weave.
12 - Ativar a layer Copy of Raster 1. Effects > 3D Effects > Drop Shadow: -10, 0, 100, 50, com a cor 2.
13 - Edit > Copy no Tube principal. Edit > Paste as New Layer. Posicionar à esquerda. Effects > 3D Effects > Drop Shadow: como preferir.
14 - Edit > Copy no Tube Decorativo. Edit > Paste as New Layer. Posicionar à direita e Effects > 3D Effects > Drop Shadow: como preferir.
15 - Edit > Copy no TituloModeradorasBySoxikibem. Edit > Paste as New Layer. Com a ferramenta Pick Tool posicionar: Position X 338, Position Y 429. Layers > Properties > General > Blend Mode; Luminance (L).
16 - Edit > Copy Special > Copy Merged. Image > Add Borders > Symmetric: 2px com a cor 4 4px com a cor 3 2px com a cor 4 Selections > Select All. Image > Add Borders > Symmetric: 15px com qualquer cor.
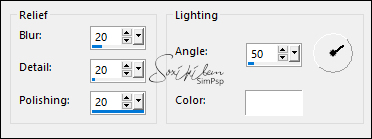
17 - Selections > Invert. Edit > Paste Into Selection. Adjust > Blur > Gaussian Blur: 20. Effects > Texture Effects > Polished Stone:
Selections > Select None.
18 - Image > Add Borders > Symmetric: 2px com a cor 4 4px com a cor 3 2px com a cor 4 Selections > Select All. Image > Add Borders > Symmetric: 30px com qualquer cor.
19 - Selections > Invert. Edit > Paste Into Selection. Adjust > Blur > Gaussian Blur: 50. Effects > Texture Effects > Polished Stone:
20 - Selections > Invert. Effects > 3D Effects > Drop Shadow: 0, 0, 100, 30, cor preta.
21 - Selections > Modify > Contract: 22. Effects > 3D Effects > Drop Shadow: 0, 0, 100, 15, cor preta. Selections > Select None.
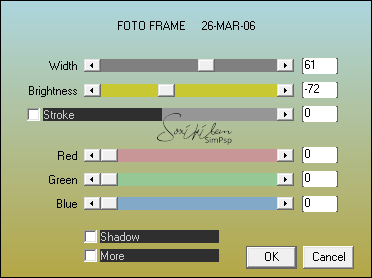
22 - Effects > Plugins AAA Filters > Foto Frame: Obs.: Se desejar mais claro basta mudar em Brightness, para a segunda versão eu usei -43.
23 - Image > Add Borders > Symmetric: 1px na cor preta.
24 - Aplicar sua marca d'água ou assinatura. File > Export > JPEG Optimizer.
CREDITOS Versao 1 & 2 Tubes Femininos by SuizaBella - Misted Paisagem by Grisi - Tube Flor by Isa
Sinta-se à vontade para enviar suas versões. Terei todo o prazer em publicá-las em nosso site.
|