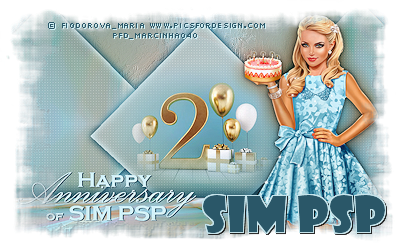
Tutorial by Márcinha English Translation by Moderation SIM-PSP Original Tutorial
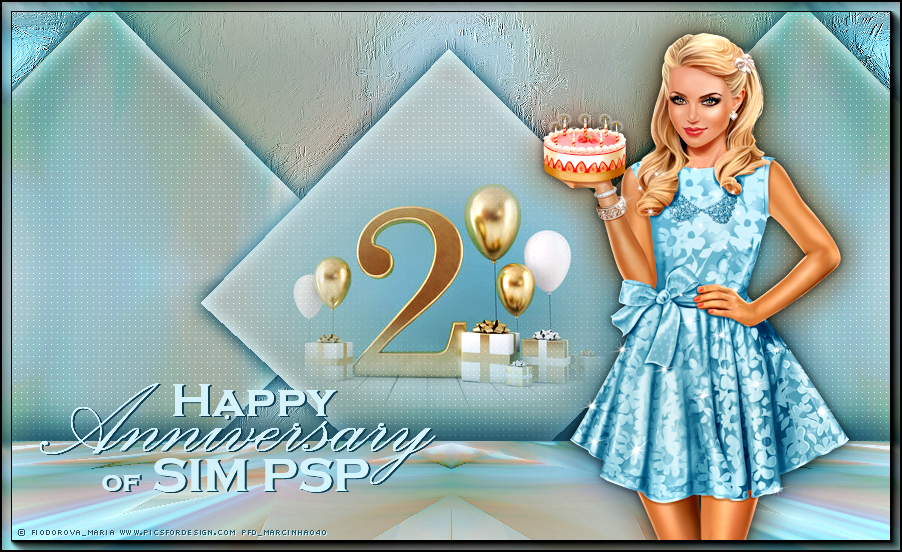
MATERIAL 1 Main Tube of your choice 1 Misted Landscape of your choice WordArt HappyAnniversary_SIMPSP Sel01_SIMP_byMarcinha **Sel02_SIMP_byMarcinha ***The Tube used is from the Artist © Fiodorova_Maria, you can buy it on the PicsForDesign website. * *Save the selections to the PSP's Selections folder.
PLUGINS Medhi > Sorting Tiles Carolaine and Sensibility > C-LDots Simple > Top Left Mirror
TUTORIAL
01 - Open the material on the PSP, duplicate and close the original. Choose two colors to work with. Foreground: dark color > #5d3b2f Background: light color > #f7cebf
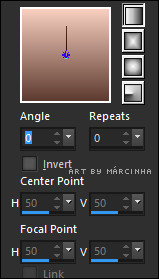
02 - Open a new transparent image of 900x550px . Paint with the Linear Gradient formed by the chosen colors:
03- Selections > Select All.
04- Edit > Copy the Main Tube. Selections > Select None.
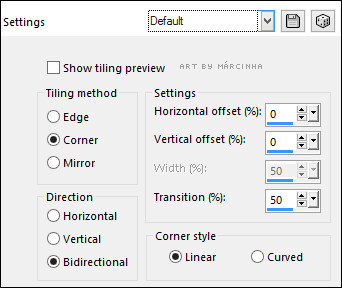
05- Effects > Image Effects > Seamless Tiling: Default.
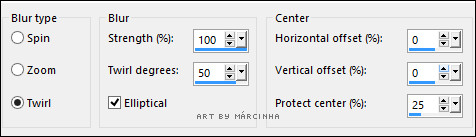
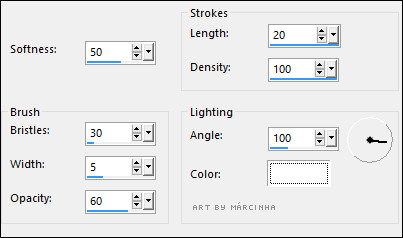
06- Adjust > Blur > Radial Blur:
07- Effects > Image Effects > Seamless Tiling: Default.
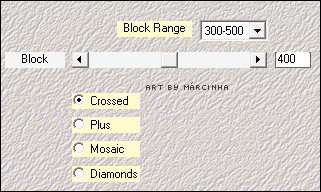
08- Effects > Plugins Medhi > Sorting Tiles:
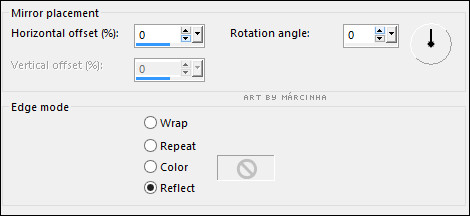
09- Effects > Reflection Effects > Rotating Mirror.
10- Effects > Edge effects > Enhance.
11- Selections > Load/Save Selections > Load Selection From Disk: Sel01_SIMP_byMarcinha Selections > Promote Selection to layer.
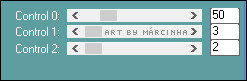
12- Effects > Plugins Carolaine and Sensibility > CS-LDots:
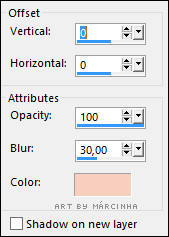
13- Selections > Invert. Effects > 3D Effects > Drop Shadow: 0, 0, 100, 30, Color: Background: light color > #f7cebf
14- Effects > Edge effects > Enhance. Selections > Select None.
15- Effects > Plugins > Simple > Top Left Mirror
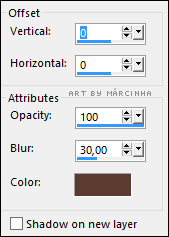
16- Effects > 3D Effects > Drop Shadow: 0, 0, 100, 30, Color: dark color > #5d3b2f
17- Activate the Raster 1 layer. Layers > Duplicate.
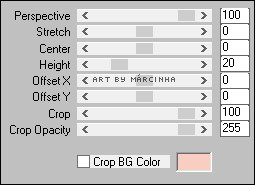
18- Effects > Plugin MuRa's Filter Meister > Perspective Tiling 1.1:
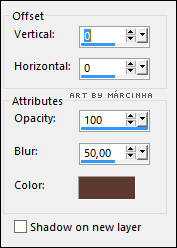
19- Layers > Arrange > Bring to Top. Effects > 3D Effects > Drop Shadow: 0, 0, 100, 50, Color: dark color > #5d3b2f Repeat > Effects > 3D Effects > Drop Shadow: 0, 0, 100, 50, Color: dark color > #5d3b2f
20- Activate the Raster 1 layer. Selections > Load/Save Selections > Load Selection From Disk: Sel02_SIMP_byMarcinha
21- Adjust > Blur > Radial Blur:
22- Effects > Plugins Carolaine and Sensibility > CS-LDots:
23- Selections > Invert. Effects > Art Media Effects > Brush Strokes:
24- Effects > 3D Effects > Drop Shadow: 0, 0, 100, 30, Color: Background: light color > #f7cebf
25- Selections > Invert. Layers > Promote Selection To Layer. Layers > Arrange > Move Up. Effects > 3D Effects > Drop Shadow: 0, 0, 100, 30, Color: dark color > #5d3b2f
Selections > Select None.
26- Activate the Copy of Raster 1 layer, which is at the top. Edit > Copy the Misted Landscape. Edit > Paste a New Layer.
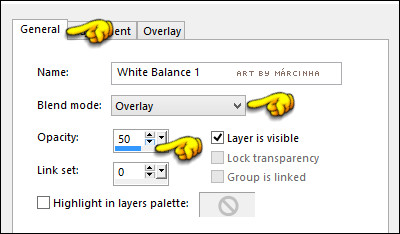
27- Layers > New Adjustment Layer > White Balance:
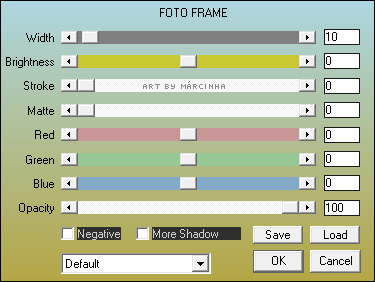
28- Layers > Merge > Merge Visibile. Effects > Plugins > AAA Frames > Foto Frame.
29- Edit > Copy the Main Tube. Edit > Paste as New Layer. Position of your choice. Effects > 3D Effects > Drop Shadow as you prefer.
30- Edit > Copy no WordArt_ByMarcinha. Edit > Paste as New Layer. Colorize your choice. Position of your choice. Effects > 3D Effects > Drop Shadow: 2, 2, 100, 0, Color: #000000
31- Image > Add Borders > Symmetric: 1px color: #000000.
32- If you prefer to resize your work.
Apply your watermark or signature.
CREDITOS Tutorial, Translation, Formatting and Artwork by Márcinha'21 Main Tube: © Fiodorova_Maria Licença: PDF_Marcinha040 Misted Landscape: Tubed by Márcinha'21
Feel free to send your versions. I will be happy to publish them on our website.
|