|
Tutorial by Soxikibem English Translation by Moderation SIM-PSP Original Tutorial
Tutorial dedicated to SimPsp's Aniversary. Two years of hard work filled with joy. Thanks to everyone who in one way or another is connected to SimPSP. But, I want to say a special thank you to my dear friend Marcinha, for having joined the dream she had with mine to form and give life to SimPsp.
MATERIAL 1 Tube of Flowers of your choice DecorSimbySoxiki amigasBySoxiki tituloBySoxiki textBySoxikibem DecorSim2bySoxiki
PLUGINS Flaming Pear Italian Editors Effect Filter Factory Gallery M
TUTORIAL
01- Open the material on the PSP, duplicate and close the original. Choose three colors to work with. Foreground: #c9ccd3 Background: #ad95a4 Third Color: #eddb9d
Extra color: #ffffff (white)
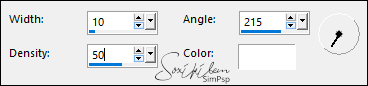
02 - Open a new transparent image of 900x500px. Form a Linear gradient with the colors of Foreground and Background.
Paint the transparency with the Gradient.
03 - Effects > Artistic Effects > Topography.
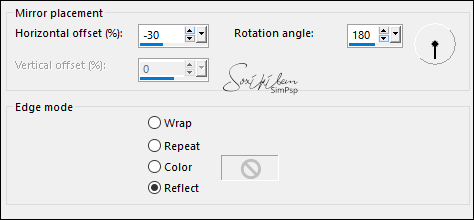
04 - Effects > Reflection Effects > Rotating Mirror.
Effects > Edge Effects > Enhance.
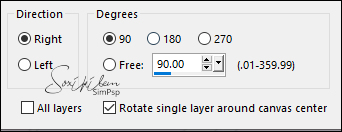
05 - Layers > Duplicate. Image > Free Rotate.
06 - Effects > Plugin Italian Editors Effect > Vetro
07 - Effects > Plugin Italian Editors Effect > Effetto Fantasma: 41, 41.
08 - Effects > Plugin FM Tile Tools > Blend Emboss: Default.
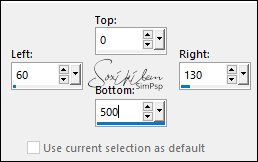
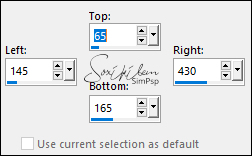
09 - Layers > New Raster Layer. Selection Tool > Custom Selection.
Paint this selection with color 3. Selections > Select None.
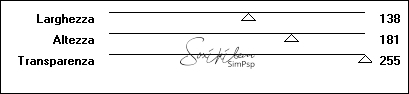
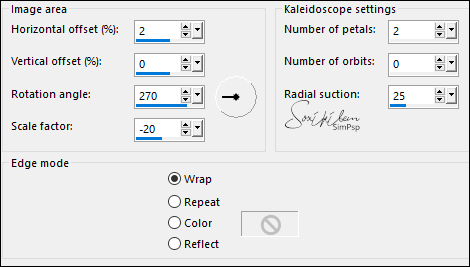
10 - Effects > Reflection Effects > Kaleidoscope.
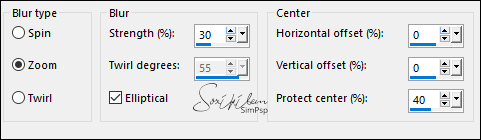
11 - Adjust > Blur > Radial Blur.
Effects > Edge Effects > Enhance. Effects > Plugin Flaming Pear > Transline.
12 - Layers > New Raster Layer. Selection Tool > Custom Selection.
Paint this selection with color 3. Selections > Modify > Contract: 5. Press the keyboard's Delete key. Layers > New Raster Layer. Paint this selection with color 3. Selection > Modify > Contract: 15. Press the keyboard's Delete key. Keep the selection. Layers > Properties > General > Opacity: 50%. Layers > New Raster Layer. Paint this selection with color 3. Selections > Modify > Contract: 5. Press the keyboard's Delete key.
13 - Layers > New Raster Layer. Paint this selection with the color: #FFFFFF (white). Edit > Copy the Tube of Flowers. Edit > Paste Into Selection.
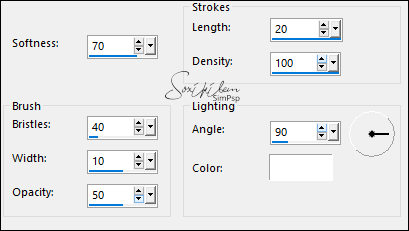
14 - Adjust > Blur > Gaussian Blur: 5. Effects > Art Media Effects > Brush Strokes.
Selections > Select None.
15 - Close the visibility of the Raster 1, Copy of Raster 1, and Raster 2 layers. Layers > Merge > Merge Visible.
16 - With the Merged layer activated: Layers > Duplicate With the Pick Tool Tool, position: Position: X 210, Position: Y 180. Layers > Merge > Merge Visible. Layers > Duplicate. Activate the Merged layer. Adjust > Blur > Gaussian: 40. Layers > Properties > General > Blend Mode: Screen. Open visibility of all Layers.
17 - Activate the Copy of Merged Layer. Edit > Copy the DecorSimbySoxiki. Edit > Paste as New Layer. Layers > Duplicate. Activate Raster Layer 3. Adjust > Blur > Gaussian Blur: 10. Layers > Properties > General > Blend Mode: Screen.
18 - Activate the Top Layer. (Copy of Raster 3) Edit > Copy the Tube of Flowers Edit > Paste as New Layer. Position to the right. Layers > Duplicate. Activate Raster Layer 4. Adjust > Blur > Gaussian Blur: 30. Layers > Properties > General > Blend Mode: Multiply. Effects > Plugin Flaming Pear > Transline.
19 - Activate the Tube Copy of Raster 4 Layer. Effects > 3D Effects > Drop Shadow: -20, 15, 100, 50, color: #FFFFFF (White).
20 - Edit > Copy no amigasBySoxiki. Edit > Paste as New Layer. With the Pick Tool Tool, position: Position X 240, Position Y 300. Layers > Properties > General > Opacity: 25.
21 - Edit > Copy the tituloBySoxiki. Edit > Paste a New Layer. With the Pick Tool Tool, position: Position X 93, Position Y 357.
22 - Edit > Copy the textBySoxikibem. Edit > Paste as New Layer.
23 - Layers > New Raster Layer. Paint with color 3. Effects > Plugin Filter Factory Gallery M > Ambrosia: Default.
24 - Adjust > Blur > Gaussian Blur: 30. Layers > Properties > General > Blend Mode: Overlay, Opacity: 50%. Image > Mirror > Mirror Horizontal.
25 - Image > Add Borders > Symmetric: 2px - Color 2: background 10px - Color: #FFFFFF (White) 2px - Color 2: background 50px - Color: #FFFFFF (White) 2px - Color 2: background
26 - Edit > Copy the DecorSim2bySoxiki. Edit > Paste as New Layer.
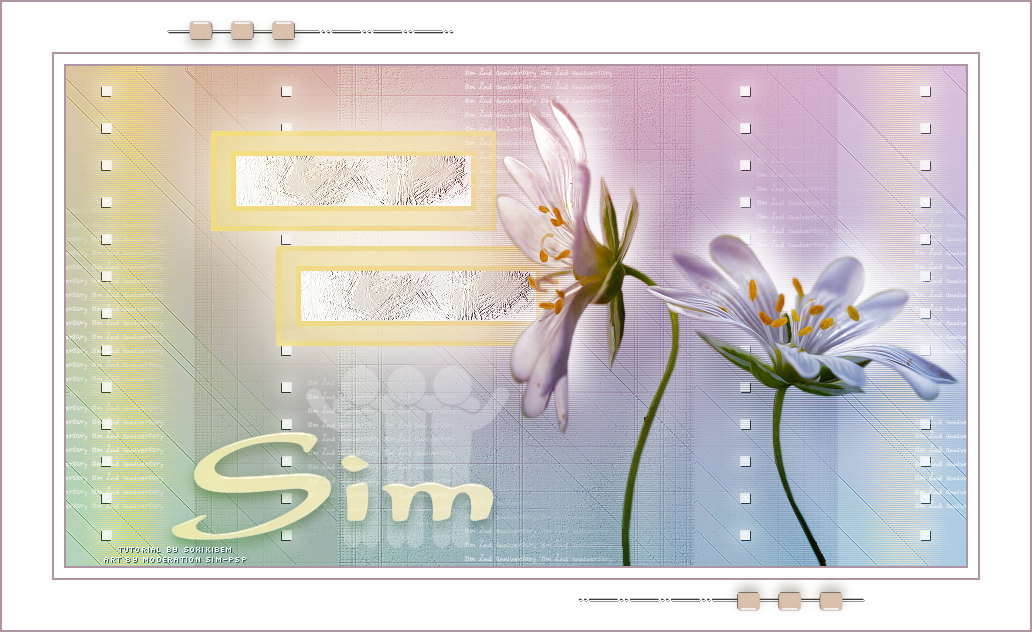
27 - If you prefer to resize your work.
Apply your watermark or signature.
CREDITS: Tutorial by Soxikibem English Translation by Moderation SIM-PSP Main Tube: Tubed by Gabry Feel free to send your versions. I will be happy to publish them on our website.
|